Photoshop for the Curious
An Overview, Part 1
My Background
A few months ago, I was chatting with ATPM’s publisher, Michael Tsai, about some of his digital photos and some of my own that I’ve submitted as ATPM desktop wallpaper images on various occasions. A conversation about me helping him with some short steps for basic color correction in Photoshop transmogrified into the possibility of making it a How To column in a future issue of ATPM. Transmogrification turned into procrastination, and I’m only now purposing to make this idea a reality. But the idea has since gone through yet another rebirth to become this series.
Prior to last year, I would have assumed that anyone who legitimately had access to Photoshop—which is not an inexpensive toy of an application—either knew their way around it or was actively learning their way around it. Michael’s suggestion made short work of squashing that assumption. I also later learned of an employee in the billing office of a graphic service bureau I occasionally patronize who has Photoshop on her iMac. She’s never used it, but she’s curious to try. She doesn’t have time for courses, nor do the designers employed there have time to assist. It just happens that this service bureau puts Adobe CS2 on every Mac (and most PCs) in the building. Site license, perhaps—I don’t know.
It is for people such as these who I believe will have the most to gain from this series. In this first column, we’ll begin at the rock-bottom basics of Photoshop. What is that box of weird-looking icons? What are those windows all around the edges of the display? What’s tucked away in those menus?
First, a quick moment to tell you where I am coming from. I most certainly am not an authority on Photoshop. In fact, I anticipate that Photoshop professionals who read ATPM will post comments that elaborate on what I write—and I enthusiastically welcome it.
My perspective is someone who is, for the most part, self-taught through experimentation and asking questions. It is through nearly 15 years of just trying things and not being afraid of what the results might be that I have gained my experience. I now routinely color balance and optimize photos to send to commercial press, perform intermediate clone editing to rid a photo of unwanted objects (“Photoshopping” is becoming as much a verb as “Googling”), and create image masks to blend portions of images into other images. What I mean to say is, there was a time when I was exactly in the same boat as those to whom this series is intended. I had access to Photoshop while in college and just started dabbling.
By the way, if you have Photoshop Elements, I suspect that a great deal of what this series will cover will directly translate to that application. For the record, Photoshop Elements is a sub-$100 “express” version, so to speak, of Adobe Photoshop. Just please be forewarned that I have had neither the opportunity nor the reason to try Photoshop Elements for myself. Similarly, I suspect that substituting the Control key for the Mac’s Command key is the only thing a Windows Photoshop user would have to remember.
In upcoming columns, we’ll cover fundamentals such as performing a basic color calibration of your monitor (it’s not as hard as you think), using the Levels or Curves palettes to adjust brightness and contrast (avoiding the temptation to use Photoshop’s Brightness and Contrast palette), fundamentals of layer effects, etc. I’ll even teach you how to manipulate almost any graphic image so that it will tile seamlessly. And yes, I’ll perhaps take on a few requests, too.
The Photoshop Tool Palette
In the first of this two-part overview, let’s just expose ourselves to the tools Photoshop presents to you after a fresh installation. This is not a tutorial for each tool—rather a quick introduction to the purpose of each tool. After all, that big vertical Tool Palette looks kind of daunting if you’ve never used it before, doesn’t it?

The Photoshop Tool Palette is a bit less daunting if you think of it in terms of the groupings that Adobe created by way of the thicker borders.
Now is probably the right time to mention that I’m presently using Photoshop version 9 (a.k.a. Photoshop CS2). The Tool Palettes in versions 7 and 8 are virtually the same, but the tools and their positions become increasingly different from version 6 and older. I’ll also mention that it is entirely likely I’ll upgrade to CS3 (Photoshop 10?) when it is released next year, smack in the middle of this series of tutorials. Whether the Tool Palette will look the same in CS3 remains to be seen.
Adobe’s Self Promotion
First of all, if you’ve ever hovered your mouse over the feather at the top of the palette and noticed that it colored itself, but you had no idea why, relax. It’s simply a quick link to the Photoshop product page on Adobe’s Web site.
Selection and Cropping
The first set of tools, highlighted in green in the figure above, are for working with selections. This simply means that they are used to isolate and work with a portion of your image. The most basic selection tool is the Marquee selection tool.
The Marquee selection tool.
Notice the tiny little blackened corner in the bottom right of that square. Whenever you see that, it means you can click and hold on that icon to choose a related alternate tool. In the case of the Marquee selection tool, you can choose between rectangular, elliptical, and single-pixel rows.

Marquee alternates.
The two icons in the second green row are slightly more advanced selection tools. The Lasso tool allows you to draw a freeform shape as your selection.
The Lasso selection tool.
The alternate tools for the Lasso allow for polygon-shaped selections and a magnetic feature to snap your selection to high-contrast edges in your image.
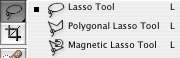
Lasso alternates.
Sorry, the Magic Wand tool isn’t a one-stop tool to automatically make your photo Ansel Adams perfect. It is used to select a range of similar pixels in your image.
The Magic Wand tool.
Depending on settings, it can select all pixels that are one specific shade of color, or it can select a defined number of neighboring color values.
These first three tools are the staples of selection. The remaining three are used to make direct adjustments to your selection.
The Move tool simply lets you drag a selected area or an entire layer around to position it somewhere else. (More about layers in an upcoming column.)
The Move tool.
The Crop tool works similarly to the rectangular Marquee selection tool, but is used to trim an unwanted portion of an image around the outer edges.
The Crop tool.
The Slice tool defines areas of action when designing images intended to be used on Web pages. Slices are a somewhat advanced aspect of Photoshop which I won’t be covering any time soon.
The Slice tool.
Slice alternates.
Editing and Painting
The red-highlighted set of tools could be thought of as the Photoshop tools that really do the grunt work. I’ll start with the Brush tool.
The Brush tool.
The variants available by clicking and holding are the Pencil and Color Replacement tools.

Brush alternates.
These tools, combined with the palette that contains countless shapes that the brush can mimic, are what allow you to pretend you’ve got a paint brush in your hand and an empty canvas in front of you.
Moving on, the left-side icons in the first and second row of the Editing and Painting section are possibly more magical than the actual Magic Wand tool.
I’ll first point to the Clone Stamp tool. Think of it much like the Brush tool, but instead of painting with a color, you can paint a clone of another region of your image.
The Clone Stamp tool.
Clone Stamp alternates.
Above the Clone Stamp tool is the Healing Brush tool—something of a Clone Stamp on steroids. The Healing Brush is a little difficult to describe without showing it in action, but it essentially performs the same function as the Clone Stamp plus an action to blend in what you’ve painted. It tries to clone the pixels from another portion of your image but retain the shading and texture of what was originally there.
The Healing Brush tool.
The variant Healing Brush options offer alternative methods of doing this same function.
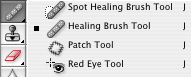
Healing Brush alternates.
The History Brush tool works similarly to the regular Brush, but uses Photoshop’s history of what you’ve done to an image to allow you to paint in an older version.
The History Brush tool.
History Brush alternates.
Suppose you applied a filter that made a significant change to your image, but you want a few areas to not have the filter effect. You can use the History Brush tool to paint a bit of the earlier, unfiltered image back in.
The Eraser tool’s function should be obvious. It is the opposite of the Brush tool, in a manner of speaking.
The Eraser tool.
Its variant tools include a function identical to the Magic Wand except that it immediately erases those pixels instead of just selecting them.
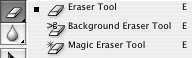
Eraser alternates.
Next to the Eraser are the fill tools. The basic fill function, labeled as the Paint Bucket tool, will flood a single color into a region.
The Paint Bucket tool.
The alternate fill tool, Gradient Fill, lets you drag a line to to create a gradient from one color to another in the direction of, and within the confines of, the line you drag.
Paint Bucket alternates.
At the bottom of this set of tools, the left icon allows you to soften (blur), sharpen, or smudge (think finger painting) a region of your image.
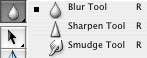
The Blur, Sharpen, and Smudge tools.
You can use the Dodge tool to lighten an area, the Burn tool to darken an area, and the Sponge tool to make an area’s colors more or less intense.
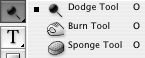
The Dodge, Burn, and Sponge tools.
Dodging and Burning are terms that harken to the traditional darkrooms where you would dodge or burn in light to make portions of a photo lighter or darker.
Drawing and Path Operations
Most of the tools in the yellow section are somewhat advanced and I won’t spend much time on them now. They are used to create lines (paths) and shapes for a variety of purposes.
Drawing and Path Operation tools.
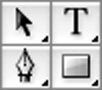
The Type tool in the upper right fits the path operation grouping because a character of text, in a way, is really just a shape that happens to look like a particular character. This is the only tool for which beginners will initially have use.
Annotation, Navigation, and Eyedropper
The last section, in blue, might be more aptly called the Miscellaneous Group. The Notes tool allows for written notes to be attached to an image, but not actually be part of the image.
The Notes tool.
The alternate choice for Notes allows for audio annotations instead of written notes. Keep in mind, you’ll want to keep a Photoshop-native .PSD file to retain these annotations. Saving in another format will likely lose them.
Notes alternates.
The Eyedropper tool makes the foreground or background color the same as any portion of your image that you click.
The Eyedropper tool.
The Color Sampler tool allows you to define up to four points which will have visible markers within your image for future reference. They can also be used to make note of the numeric color value of the specific pixel beneath the marker. The color value is found in Photoshop’s Info palette.

Eyedropper alternates.
The Measure tool reveals the distance (such as inches or number of pixels) from one point to another.
The last two tools are probably the two least-used tools—sort of.
The Hand tool.
The Zoom tool.
I, personally, never click these because I prefer to simply hold the space bar (except when editing a text field) to access the Hand tool and I use Command + and Command - to zoom in and out. The purpose of the Hand tool is to simply slide around your current view within a window when you are zoomed in close. Using the Hand tool does not modify your image.
The Rest of the Tool Palette
The remaining Tool Palette items are toggles, of sorts, for various functions.
Color Tool
The Foreground/Background Color area is one of Photoshop’s methods for making color selections.

Foreground and Background Colors.
For now, only worry about the foreground color (the upper left of the large, overlapped squares) unless you want to play with the Gradient Fill tool, which can create a gradient starting from the foreground color and ending with the background color.

When the Gradient Fill tool’s Foreground to Background Color mode is selected, the gradient colors match those selected in the Color Tool.
The curved arrow in the upper right of the Color Tool swaps the foreground and background colors, and the miniature black/white squares reset the colors to—you guessed it—black and white.
Quick Mask
Many of us have used sheets of paper and masking tape to cover windows, doors, etc. so they aren’t exposed while painting a wall. Masking in Photoshop is much the same, except the intent is that the masked areas will never be seen again. But since it is a mask, you can always restore all or part of the original image. If it had instead been erased, it would be gone. The Quick Mask tools in the Tool Palette are part of Photoshop’s masking features which we will cover later.
The Quick Mask tool.
Viewing Mode
The Viewing Mode selector is a simple, three-way toggle.
The Viewing Mode selector.
The left button presents your image in a standard window, complete with scroll bars, if needed. The middle button fills your screen with a neutral grey and places your active image in the center. When making color adjustments to an image, a neutral grey is the best thing to surround your photo so your eye is not distracted by whatever might be on your desktop. The third button is the same, but uses black instead and temporarily removes the menu bar. You don’t want to use this for color adjustments because of the high contrast between the black and your lighter image, but this is a nice way to present an image to a friend or client. The Tab key can also be used to temporarily hide all of Photoshop’s palettes.
ImageReady
Adobe ImageReady is a sister application that ships with Photoshop and is used primarily for finishing an image for use on the Web.
Edit in ImageReady.
Remember the Slice tool up above? Slices become very important when using ImageReady. This icon at the bottom of the Tool Palette simply transfers your image to ImageReady.
We Made It!
Here’s your homework assignment. Memorize those four main groupings of Photoshop tools and you’ll spend considerably less time hunting for the right one. Then, make a duplicate file of a digital photo (always keep original, unaltered versions of your photos) and just play with each tool. Don’t worry about anything else you might find in the other palettes or menus. Just play with the tools. You cannot hurt anything by trying each one out. If you think you goofed up, simply head to the File menu and hit the Revert command. Observe exactly what happens when you use each tool.
Also, remember that some tools are multi-step tools. For example, to use the Clone Stamp and Healing Brush tools, you must first tell Photoshop from which area of the image you wish to clone. If you don’t, you’ll see a message box telling you as such. You must hold the Option key and click a source area first, then move elsewhere in the image and start Cloning or Healing. If you’re still having trouble, don’t be too concerned, but feel free to ask for more detail about a tool by posting a comment. I’ll answer it as soon as possible.
Next Month…
In part two of this overview, we’ll quickly peek at the other palettes that appear when Photoshop is first launched and find out what sort of functions are available in each of the menu bar items.
![]() Copyright © 2006 Lee Bennett, lbennett@atpm.com.
Copyright © 2006 Lee Bennett, lbennett@atpm.com.
Also in This Series
- File Format Fever · November 2008
- Don’t Reset—Preset! · October 2008
- Don’t Yield—Merge! · September 2008
- What If I Just Left It Alone? · August 2008
- Screen Replacements—When Reality Isn’t Real Enough · July 2008
- No Smoking Gun: Re-tooling Dodge and Burn · May 2008
- Mask-erades · February 2008
- Back in February · November 2007
- I Love Layers · October 2007
- Complete Archive
Reader Comments (13)
Just go on!
Now, if I can find out how to change bits of images - e.g. by inserting a speech bubble - that would be cool
Just wish you would do it more frequently than a month!
Joan
(One "tool" I'm all too familiar with is that Adobe product-page link - I accidentally click on that stupid thing probably two or three times a week, and it drives me nuts! Not what I'd call good salesmanship.)
And speaking of grammar, shouldn't that first sentence have read, "That's one of the best first classes to which I've ever been." ? :-p
Thanks again
Anne from Australia
Add A Comment