Review: Studio MX

Developer: Macromedia
Price: $899; $499-699 (upgrade, see Macromedia’s Web site)
Requirements: G3-based Mac with Mac OS 9.1 (with MRJ 2.2 and CarbonLib 1.3) or Mac OS X 10.1, 96 MB application RAM, 16-bit color, 1024x768 resolution, 510 MB available disk space.
Recommended: 128 MB application RAM
Trial: Fully-featured (30 days)
Studio MX is Macromedia’s new bundle of its popular animation, vector graphics, and Web development software, combining Flash, FreeHand, Dreamweaver, and Fireworks. The MX package also represents version upgrades for all of these tools, although the review copy we received still included FreeHand 10. Purchasing Studio MX now will include FreeHand MX (version 11) according to the Macromedia Web site. The new version’s features are listed near the end of this review.
The key feature of Studio MX is the interoperability among the applications. This enables a user to effortlessly manipulate a project with any of Studio MX’s tools. The seamless transfer capability provides the benefits of an all-inclusive single application without becoming a bloated, one-size-fits-all application (ahem, Netscape).
According to the Studio MX manual, each Studio MX application provides “a common interface and default location for the Tools panel so that you can seamlessly work with tools, color palettes, and other features to build images and move them across the products.”
Dreamweaver
Dreamweaver is Macromedia’s premiere Web content editing tool. It supports development in HTML, XHTML, XML, ASP, ASP.NET, JSP, PHP, and Macromedia’s own ColdFusion. Included with Studio MX, ColdFusion is a scripting environment to build dynamic Internet applications with aided integration with other Web-based development platforms.

Whether you prefer raw HTML editing, WYSIWYG editing, or both, Dreamweaver caters to individual taste.
Web developers can choose the style of editing they prefer, as Dreamweaver works as both an HTML code editor and a WYSIWYG (What You See Is What You Get) editor. Both modes can be used interchangeably with a common, drag-and-drop toolbar to add the desired functions to the Web page.

Dreamweaver makes creating elements as uncomplicated as possible by letting you work visually and by code, simultaneously. This example shows the steps to create a table. First, click the Insert Table button from the toolbar.

Define initial values for the table’s look.

Fine-tune the table’s look either by changing attribute values in HTML view, or by stretching the table’s sides and corners in WYSIWYG view.

Adding cell content in one view automatically updates the other view.

To join cells into a rowspan or colspan, first select the cells to be joined. An entire row or column can be quick-selected, as shown.

Click the merge button under the Column section in the Properties palette.
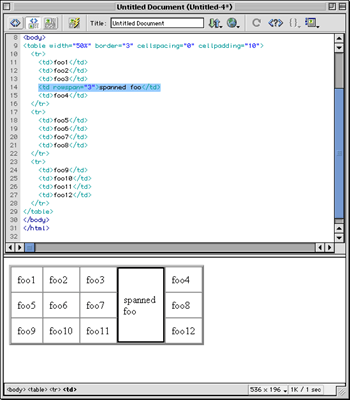
Your cells are now merged and you can add content as normal.
Another major feature of Dreamweaver is site management. With just a few clicks, developers can upload and maintain their Web site files and modify any element of a Web document with ease.
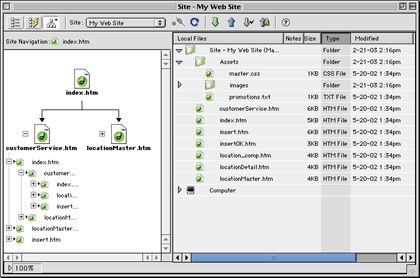
Built-in site management helps keep your remote site synchronized with your local files and can display your site in a hierarchical tree format.
One of the most unique options in Dreamweaver is the integration with its supported coding languages. No matter which language you use, your work will be color-coded and numbered. Basic templates are included for all languages, allowing you to drag-and-drop objects from multiple scripting languages into a Web page.
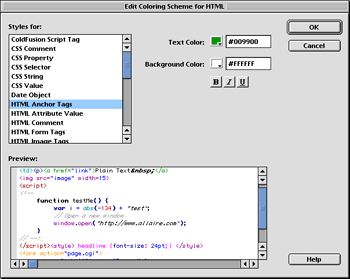
Separate color coding schemes visually identify each programming language used in a document. Every scheme is customizable.
Flash
Flash is used to create multimedia and user interfaces for the Web. The files that are created are generally very small in size, permitting even dialup viewers to experience design without huge wait times. This is accomplished by the use of vector-based graphics. Bitmapped images can also be used in Flash documents that are also optimized for speed. Web site graphics were essentially based only on bitmapped images until Macromedia Flash became one of the first successful implementations of vector-based graphics on the Web.
The free Flash Player plug-in is installed by default in nearly all current Web browsers, and is easily downloaded and installed in most other browsers. This large user base makes Flash an attractive option to create visually rich and bandwidth-friendly presentations of Web-based information.
With the included tutorials and samples, you’ll be animating in minutes. Flash uses a very intuitive menu system to provide access to everything you need for your project. If you’re already comfortable with using time-line-based editing for video in such applications as iMovie or Final Cut Pro, you should be right at home in Flash.

Create your Flash animation using objects and functions from easily-accessible menus surrounding your stage area.
One of Flash’s most often used functions is Motion Tweening to animate an object. The following screen shots demonstrate how to create a simple animation:
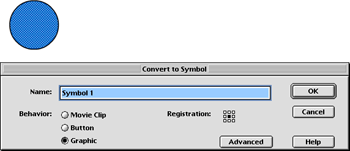
Step 1: Convert a selected graphic into a symbol with the Convert to Symbol command in the Insert menu and set the Behavior to Graphic.

Step 2: In the Timeline, select the frame that will be the last frame of the animation and select Keyframe from the Insert menu. The clip’s length will be indicated as a light gray bar in the Timeline.
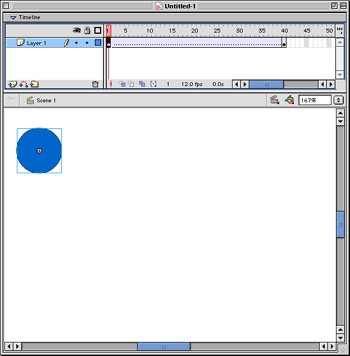
Step 3: Click the first frame of the animation and select Create Motion Tween from the Insert menu. The clip will change color to blue with a dashed line, indicating that the object has been attached to the keyframe you defined in Step 2.
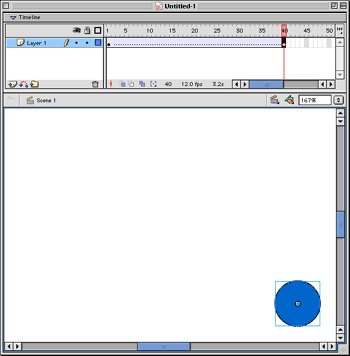
Step 4: Click back to the last frame of the animation (the keyframe). With the pointer tool, drag the object to the desired ending location of its animation. To move the object in a straight line (45-degree increments), hold the Shift key while dragging.

Step 5: Test your animation by pressing the Return key. This snapshot has the Onion Skin option enabled (the darkened button at the bottom of the time line) which displays a range of steps of your final animation. The range can be changed by dragging the left and right sides of the darkened area at the top of the time line.
Your objects aren’t limited to moving in a straight line. Objects can also be animated to follow a nonlinear path as well as change color, size, rotation, etc. as it progresses along the time line.
A new feature in Flash MX is the close integration with Components (see bottom right of the above illustration). Components are objects such as check boxes, drop down lists, submit buttons, and text fields. These allow easy creation of oft-used interfaces in the Flash document.
Third-party applications such as Swift 3D allow Flash to handle three-dimensional input and create even more visually rich designs.
Fireworks
Popular for creating rollover and pop-up navigation effects for Web pages, Fireworks includes tools for building vector or bitmapped graphics, layering interactive effects, then integrating the finished effect into a Dreamweaver or Flash project. The built-in styles help you quickly create interactive menus without any knowledge of the scripting languages required to make them.
You can start by using templates to create navigation buttons, or by importing your own graphics created in another image editing application.

To create an effect, simply follow the instructions of the step-by-step interface which will guide you through the process of creating a rollover and/or pop-up menu.

Step 1: Define menu items in the order you want them to appear, along with corresponding links and, if required, targets. Use the provided buttons to set up nested, hierarchal menus.
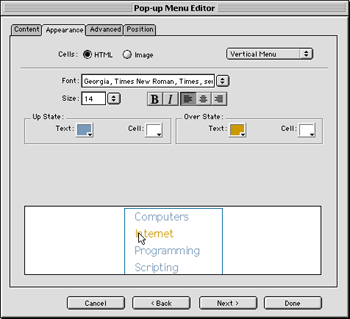
Step 2: Customize the menu’s look by choosing HTML-created or image-created buttons. Image-created buttons provide a selection of bevels and background textures to choose from.

Step 3: Fine-tune the look of your menu by adjusting the size, padding, and spacing of each button (cell), how far to indent text from the edge of the cell, how long the menu should remain visible after the mouse pointer has moved away, and settings for borders around the menu.
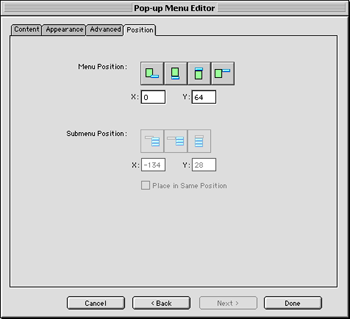
Step 4: Finally, define where the menu should appear. Four preset buttons are provided for common menu positions plus three default submenu positions. X and Y values let you make fine adjustments.
FreeHand
FreeHand was originally positioned as a vector-based illustration package intended for creating graphics for desktop publishing projects. Today, its capabilities reach far beyond the print industry. ATPM previously reviewed FreeHand 10 in the July 2001 issue and, like Studio MX, gave it an Excellent rating.
“FreeHand has outgrown its category so much that it would be unfair to compare it to [Adobe] Illustrator.” —Jamal Ghandour
As previously mentioned, the review copy of Studio MX was sent with FreeHand 10. A page on Macromedia’s Web site lists the top 10 new features of FreeHand MX as:
- Unlimited stroke, fill, and effect attributes to a single vector or text object.
- New Object Panel providing stacking control of multiple attributes.
- Live Effects apply distortions and effects without altering the original object.
- Ability to reshape rectangles, ellipses, and polygons while maintaining control and editability of graphic primitives.
- An updated workspace designed to integrate with other Studio MX products.
- Flash MX integration.
- Action Tool enabling drag and drop of Flash MX actions among objects, symbols, and pages.
- Connector Lines Tool to quickly map information architecture, data flows, and site maps.
- Additional new or enhanced creative tools including Extrude, Blend, and Eraser, plus alpha channel support for imported bitmaps.
- Fireworks MX integration.
Conclusion
In reviewing Studio MX, we felt the most important aspect that merits praise was not the exceptional capabilities of any one of the applications, which can be purchased individually. Rather, at $899, Macromedia is wisely offering the products as a single, reduced-cost package (saving about $700). Purchasing comparable Adobe products would total at least $1,200. Adobe’s Web Collection package is a $999 alternative that also includes Photoshop and Acrobat, but not LiveMotion—Adobe’s answer to Flash. Indeed, LiveMotion projects are typically finished as QuickTime or Flash files! Also, the Web Collection package is simply a bundle of the included Adobe products. While Adobe has been singing about the integration between the latest versions, we feel Studio MX’s integration is superior, practically making it a must-have for the Web developer looking to have support for the widest array of coding languages.
Reader Comments (3)
Rest assured that the Studio MX apps work as well, or better, than we've described when they're running under OS X.
Add A Comment