What’s Under the Hood
Got Vinyl? LPs to CDs Part 3: The Playlist and Burning to CD
The Story So Far
In the first part of this series I discussed the relevant terminology and went over the required hardware. Last month, I looked at how to record and how to filter your recording.
When you copied your original recording onto your Mac and filtered it to your liking, you did it as one continuous piece of audio. In this form, there is nothing separating each song or track; if you were to burn your music to CD at this point, you would not be able to switch between individual tracks at will. The next step, therefore, is to break your music into individual tracks. This article, the last in the series, will show how to break up your recording into individual tracks, arrange those tracks into a playlist, and burn that playlist to CD.
Amadeus II
Doing this in Amadeus II is straightforward. Highlight the first song in your recording. Make sure you check the beginning and end of your selection so you don’t clip either end of the song. From the Edit menu, select Copy, and from the File menu, select New. You will then be presented with a new sound window. Select Paste from the Edit menu and that track will be pasted into the sound window. To be on the safe side, play back both the beginning and end of this track. If the music starts or ends abruptly, discard the new file and re-try selecting the track in your original recording, copying and pasting it into a new file.
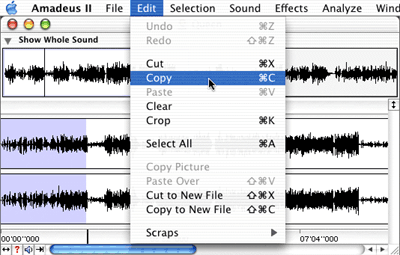
Amadeus II: Copying a Track
You might also want to play back the track in its entirety to make sure all unwanted noise has been eliminated. If not, go back to part two of this series and apply the various filters as I described. Once you are satisfied with that track, choose Save As… from the File menu, name the file, and click Save. Then, go back to your original recording and repeat this process with each of the rest of the tracks. I suggest that you save all of your tracks in a new folder.
Final Vinyl
Last month, I reported that Final Vinyl (which, as you will recall, comes bundled with Griffin Technology’s iMic) lacked the filters required to restore your recordings. Sadly, I have also found it to be weak when it comes to cutting your music into tracks. Although the instructions did explain how to place “cue marks” between each cut, they did not explain how to save each track.
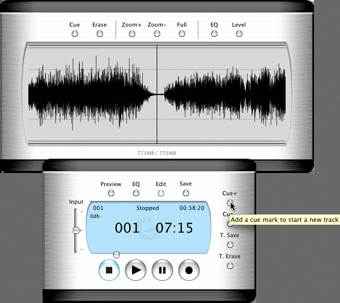
Final Vinyl: Adding a Cue Mark
The instructions tell you that for each break between two songs found while playing back your recording, you should select Pause from the Control window and then click on “Cue+” in the Control window. This will then put a marker between the two tracks. At this point, the instructions leave you hanging on what to do next. I tried to save, thinking it might save the tracks individually, to no avail.
Worse, Final Vinyl saves its audio files without type and creator codes. The type code must be set to AIFF (all caps) so that other editing applications can read them. There are many utilities available that let you change a file’s type and creator codes, one example being Super Get Info, but that is beyond the scope of this article.
I could go on about Final Vinyl’s weaknesses, but there are alternatives to Final Vinyl. I have already tested the iMic with Amadeus II, Peak LE, Spin Doctor, and Montage. Of these four, Amadeus II and Peak LE worked with the iMic because they support Apple’s Sound Manager, for which the iMic acts as an input source.
There may be other audio software available that is also compatible with the iMic; if you know of such software, please let me know by e-mail and I will try to compile a list for next month’s column. If you plan to use the iMic, I recommend that you use Amadeus II to record and edit your music; I don’t think it’s worth using Final Vinyl, even though it’s free.
Peak LE
Separating recordings into individual tracks works very well in Peak LE, and it is done by breaking your music into regions. A region is a segment of audio bounded by markers that signify the start and end.
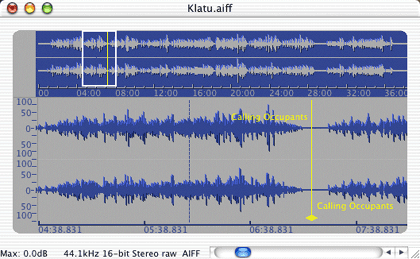
Peak LE: Marking the End of Track One
To create a region, click at the beginning of a song. Then find the end of the cut and Shift-click there to highlight that song. From the Action menu, select New Region. A dialog box will appear asking you to name that section of music. Choose a name, click OK, and that section will automatically be marked off as a region, with start and end markers designated by two yellow lines.
The thing I like most about this method is the fact that these lines are not set in stone. If you listen to the end of the region and find it cuts off prematurely, you can click on the region marker and move it to the correct position. Once you have created your first region, repeat the process for the other songs in your recording.
After you have separated your recording into regions, you will be ready to create your playlist from within Peak LE. In the File menu, select New > Playlist and a blank Playlist window will appear. Next, go to the Window menu and select Contents. This will open a content window that displays all of the regions you marked off in your recording. Now all you have to do is drag your titles over to the Playlist window. If they are not in the right order, simply drag a title to another position.
Once you have the playlist the way you like it, go to the File menu, select Save As…, and give your playlist a name. Then you are ready to burn to CD. Peak LE is designed to work with Toast 5 and higher, and a copy of Toast Light is bundled accordingly.
At the top of the playlist window is a set of buttons. On the left side next to the trash can you will see a button with a small icon of a CD and a letter B within it. Click it, and Peak LE will automatically launch Toast and copy the playlist over. Unfortunately, the track titles do not carry over. You will have to rename the tracks in Toast by double-clicking on each title and retyping its correct name.
CD Spin Doctor
There are three different ways to separate your recording into tracks using CD Spin Doctor. Auto-Define Tracks (ADT), found in the Tracks menu, will automatically go through your recording looking for points of silence. Each time it finds such a point, it places a marker there.
The problem with this method is that if there is a false ending or sudden drop in sound, ADT will place a marker there causing one track to become two or even three tracks. ADT does an even worse job with classical music, and removing unneeded tracks can become very tedious especially when eight tracks become 20, or more. Roxio recommends that you only use this function when you are sure that all tracks in a recording are continuous, with no false audio drops.
The Define Track function, also in the Tracks menu, works in almost the same way as the New Region command does in Peak LE. Before you start this process, expand the window to fill your screen; this will help you find the gaps between each track with more ease. For some reason the zoom button at the top left of the window is grayed out, so use the drag handle on the bottom right corner instead.
Now, find the beginning of the first track. Click where the music begins and drag to the right, keeping your eye open to when that track ends. Once you find that point, let go. That section will be highlighted. Select Define Track from the Track menu; that track will now have markers set at the beginning and end of it and a generic title will appear in the Playlist window. Repeat this process for your other tracks.
A mistake in the start or end time of a track can also be easily corrected. Select the track you wish to modify from the playlist to highlight it. Go to where you wish to make the correction. Shift-click in the blue area next to the marker and drag in the direction needed to correct the mistake. As you drag, the area you move over will turn white. Once done, release the mouse, and the marker will move to the new point. Although this procedure is described in the manual, it neglects to say that you need to Shift-click when you drag. The book says to just click and drag. If you do that, you will de-select the entire track.
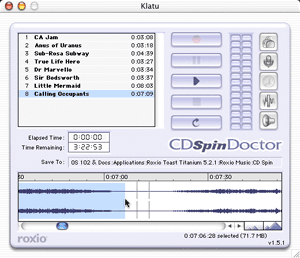
Adjusting a Marker in CD Spin Doctor
One thing I do not like about this method is that you cannot Shift-click when choosing a track. That is why expanding the window to the full size of your screen is so important, as it will greatly reduce the amount of scrolling.
Once you are done breaking your music into tracks, you can double-click on each track and name it. Spin Doctor comes packaged with Toast Titanium, which means that once you are done with your playlist you can transfer it directly to Toast and burn your CD (but not before setting the pauses, as described below).
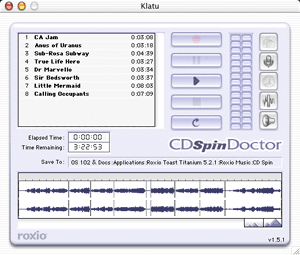
Tracks Defined in CD Spin Doctor
Unfortunately, each time I clicked on the Toast icon button in Spin Doctor things did not seem to work right. Yes, clicking on the button did launch Toast, but the audio tracks did not transfer once Toast was fully open. This turns out to be a bug in Spin Doctor under Mac OS X 10.2. If for some reason the tracks are not automatically transferred to Toast upon clicking the button, simply select all the tracks in Spin Doctor and drag them onto the Toast window. This workaround is not mentioned in the manual or on the Web site.
There is a third, also undocumented way to section your recording. First, create a new folder on your desktop. Give that folder the name of your recording. Now, go back to Spin Doctor and highlight the first track. Then drag that section of audio to the folder on your desktop. That track will be copied into a new file in the folder, which you can rename. Follow these steps for the remaining tracks.
Montage With Ray Gun Pro
Last month I discussed how to use Ray Gun Pro (RGP) in conjunction with Montage. In doing so, I left you in limbo as to what to do after setting RGP to your liking. That’s because before you can actually apply your changes in RGP, you must first section your recording into tracks and then export them. I should note at this point, in case the following instructions are hard to follow, that Arboretum plans to release an update to Montage+RGP in about a month, and the documents are being re-written in areas to make using Montage and RGP easier to understand and use.
With your recording still encapsulated in RGP, click the dark blue bar area in the music window. This will turn the music section black. Then, find the first break between track one and two. At the very top of the music window is a time line bar; click once in the bottom half of the time line bar, and a blue playback marker will appear. At the top of that marker is a small blue disk with an arrow within it; clicking and holding on the disk will let you move the marker to the left or right.
When you have the marker where you want it, select Split from the Edit menu and Montage will set the first track. Then move to the next break between tracks two and three, set the marker, select Split, and Montage will create the next break. Repeat this process for the rest of your recording.
The thing I like most about this method is that you do not have to set markers up at each end of a track; Montage remembers where you left off each time. This is very useful when one track runs into another without a natural break between the two.
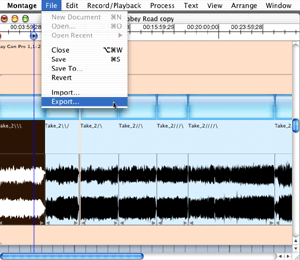
Montage: Exporting a Selected Track
It is now time to export the tracks. I suggest that you now take a moment and double-check that the settings you have applied by RGP are how you want them, because these settings will be applied to your tracks as you export them.
Go to each track and click in the dark blue bar, which will highlight that track, then select Export… from the File menu. A small dialog will pop up; use the default settings and click OK. Montage will then render that track as an audio file, applying all your settings. Once this is done, the standard Save window will appear. Create a new folder, name the file, click Save, and move on to the next track.
Correction: last month I said you had to buy Montage and Ray Gun Pro together for $250. It has come to my attention that you can buy Ray Gun Pro by itself with a free limited copy of Montage for $149. Arboretum did this intentionally so that people who want to work only with audio do not have to buy the full version of Montage.
Toast: Importing
The next step is to import the individual files you just created into a disc burning program. I found Toast to be by far the most flexible and user-friendly pieces of software for this task, although you may prefer to use iTunes. I will discuss how to use iTunes to burn audio CDs at the end of this article.
In Toast’s main window, select Audio. In the Finder, navigate to the folder you saved your tracks in, then select and drag all of the files to the Toast window, or drag one file at a time. If, in Toast, the tracks show up in the wrong order, you can click and drag each track to another position in the list.
Toast: Burning
To the left of the Title column is the Pause column. Set all the pauses except the first one to zero. If you do not do this, there will be an extra gap of silence between each track. This silence will be very different from the transition made going from one track to the next. I made that mistake on my first attempt, and the result just did not sound right.
Once you have adjusted the pauses, all you have to do is insert a blank CD, click Record, and let your Mac do the rest.
iTunes
iTunes does not yet offer the means to separate a single recording into tracks, but if you prefer iTunes to Toast when it comes to burning your CD this is the section for you.
Before you import your tracks into iTunes, open the iTunes Preferences window and click the Burning icon. Set the Disk Format to either Audio or MP3 CD, with a Gap Between Songs of None.
Now, click the Advanced icon. This is very important. Deselect “Copy file to iTunes music folder when adding to library.” If you do not do this, all of your tracks will be copied into iTunes’ Music folder, eating up another 500 to 700 MB of space on your hard drive. Click OK to dismiss the Preferences window.
To import your tracks, first select New Playlist from the File menu. Name your playlist by clicking on the “untitled playlist” title in the Source column. Then, drag all your tracks over to the iTunes window. Order the tunes the way you want them, click the Burn CD button in the main iTunes window, insert a blank CD, and iTunes does the rest.
And the Winner Is
Most of the material I have discussed in the past three months does the job. When it comes to hardware, do your homework.
I could not be happier with my Stanton ST8-80 turntable. M-Audio makes some great audio processing cards, and now it has an external version of the Audiophile 2496 retailing as the Audiophile USB, for $249. I hope to have a look at it sometime in the future. The iMic is a great economical way to record audio on your Mac if it lacks PCI slots.
For $25, I would be crazy not to say that Amadeus II is a great entry-level program for those who want to test the waters of recording and editing. Spin Doctor is also useful, and it comes bundled with Toast. Peak LE is great for breaking your music into tracks, but it will have to wait for Arboretum to release Ray Gun Pro as a plug-in to make it whole. Montage with Ray Gun Pro is in its early stages, and according to Arboretum the next update will bring major changes and improvements. If you are serious about your audio and want to use Montage with Ray Gun Pro, I recommend that you wait till the update comes out.
Last Words (For Now)
What started out as a one-off article has, to my surprise, mutated into a three-part series. Before I close—gosh, did I actually say close?—I’d like to make some final points.
First, take your time. Do not try to rush through the whole process. Clean your albums before recording. The cleaner the album, the less noise will be picked up. Next, be careful with your filters. Listen to your music often as you apply the filters. If possible, use headphones to get a better handle on how your music sounds. Check and double check as you break your music into tracks. Nothing can be more infuriating than to find out that you wasted a whole CD by cutting a single track short.
Lastly, I will stress again what I mentioned last month: avoid using the microphone port when recording onto your Mac. If you use it you run a much greater risk of picking up all the nice electrical noises created by your Mac’s internal fan, hard drive, CD drive, and other components.
Next month, I will either do a utility roundup or publish an article that I have been slowly piecing together on the latest technology in input devices. That is it for now. By the time you read my next article, another year in my life cycle will have passed. (Yes, I’m a stubborn Taurus.) Until then…End of Line.
![]() Copyright © 2003 Robert C. Lewis,
rlewis@atpm.com. Robert is a Mac consultant.
Copyright © 2003 Robert C. Lewis,
rlewis@atpm.com. Robert is a Mac consultant.
Also in This Series
- Tips—Getting More Out of Your Mac · June 2003
- Got Vinyl? LPs to CDs Part 3: The Playlist and Burning to CD · May 2003
- Got Vinyl? LPs to CDs Part 2: Recording and Editing · April 2003
- Got Vinyl? Converting LPs to CDs Part 1: Terminology & Hardware · March 2003
- Eye Candy for the Mac · February 2003
- New Year, More Utilities · January 2003
- ’Tis the Season · December 2002
- What’s Under the Hood · November 2002
- What’s Under the Hood · September 2002
- Complete Archive
Reader Comments (18)
What are these things called so I can do some more research on them? Have you covered this aspect of digitizing before? If so, I have either missed them or forgotten them. Both of these possibilities happen more than I care to admit.
I have tons of vinyl, 45s, and 33-1/3s. I even have a few 78s. I do NOT have a CD burner, but this may make it worth it to me.
I do not know what type of Mac you have but, after you read part one, I think you will know what your options are for input devices. The Audiophile USB by M-Audio is rather new. I hope this helps. End of Line.
You can also play back into the stereo using the iMic and an input channel.
The really sad part about all of this is that the post production work you can do to clean up your originals can easily take several weeks per track! Sigh. Some of us can be compulsive.
I would really have loved your article about 3 years ago when I first started digitizing my vinyl. However, it has been a good review of much more current technology. You did miss the Felt Tip Studios product, however.
It will ask for a folder to put the files in and the format you want to use, then will put the contents between each marked position into separate files. It works like a charm. I really have grown to like this program, a bargain at $25!
I had purchased an iMic to get around the aforementioned Spin Doctor problem, so I recently gave Final Vinyl a spin, with poor results. Namely:
I have an old G3/266DT, upgraded to G4/500 with 6 PCI USB ports and 2 PCI Firewire ports. Final Vinyl looked nice, the play-through sounded nice, the controls looked OK, but whenever I clicked the Record button, the program stopped doing anything. AARGH! The Record button basically worked exactly the same as the Stop button!
An e-mail to Griffin Tech got the following response: "We're sorry you are having a problem with Final Vinyl. Apple does not support third party USB cards for USB audio. Since we use the Apple driver for USB audio, we have no way of addressing this."
WHAT? The device/software works perfectly EXCEPT when asked to begin saving the input to disk, and that's the audio driver's fault? This doesn't seem right to me.
So, I'm testing Sound Studio with the iMic and the Mic-Port (sorry, Robert). The options in SS are a bit overwhelming, but it seems to work pretty well.
Well written and researched. Thanks so much.
I am getting a strong buzzing noise in my results. I suspect it is a result of my ungrounded turntable. I have an old Pioneer PL-530. I'm using the iMic on an iMac and Amadeus. I have the turntable run through a Recoton SP-2 preamp. The preamp only has the RCA inputs, no ground, so my turntable's ground wire is hanging free. Do I have to buy more stuff? Help.
cl
The chassis ground did not cut it, but the electric ground did the trick. Dana's instructions on splitting files in Amadeus are super easy. Thanks for a great resource to get me going!
I noted that the surface noise filter process described here for Amadeus often clipped some of the subtler moments in my recordings. Beware.
Add A Comment