How To
Connecting a System 6 Mac via LocalTalk
This tutorial describes how to connect two Macintoshes via LocalTalk when you’re using System 6. This is ideal for backing up hard disks, or to connect an old Mac (for example a Macintosh Plus or equivalent) with a newer one. Here’s a list of tools you’ll need:
- Two Macintoshes (one running System 6).
-
A standard Macintosh printer cable.

- One disk of 1.4 MB size.
- The AppleShare File Server disk image. Important: When you download this file with a Windows/DOS/Linux computer, you also need one Macintosh which is able to read both 1.4 MB PC Disks and 800 KB Mac disks.
- StuffIt Expander (version 5.5 works fine) for extracting the disk image.
- Disk Copy to create readable disks from the image files.
- System 6.0. Important: When you have something like System 6.0.7 and not the real System 6(.0), you must copy the System Folder from the disk image to your boot disk. System 6.0.7 can’t be updated by the software on the image; only System 6 can be updated.
To be able to follow my tutorial step by step, you need one Macintosh with System 7.5 and AppleShare server extensions installed, and one with System 6.0.7. Other configurations should also work, but some may perhaps not be set up correctly with my tutorial.
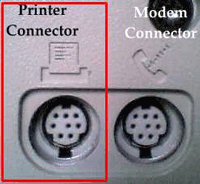
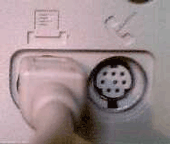
Connect the two Macintoshes via the printer port, found at the back of the computers (highlighted in red).
Download the software you don’t have that’s listed above. You needn’t download System 6; it’s included on the disk image.
Turn on both Macs and wait for them to boot until you see the desktop. If you had to download StuffIt Expander or Disk Copy, install them before continuing. If you downloaded the programs to a non-Macintosh computer, copy them on 1.4 MB PC-formatted disks and insert them into your Macintosh (the one with System 7 or newer). It will be able to read them (requires the extension PC Exchange, which is provided with System 7 or higher). Now install the programs.
Setting up System 6
Note: If you downloaded the file AppleShareFileServer2.sit to one of the Macintoshes you want to connect, you can skip the next step. When the Macs are ready, copy the file “AppleShareFileServer2.sit” from your PC to a 1.44 MB Windows-formatted disk and insert it into your Mac drive. The Macintosh must be able to read both 1.4 MB and 800 KB disks (see above). Copy the file to a temporary folder on your hard disk and eject the disk.
Now open StuffIt Expander, select the copied file on your hard disk, and extract it. After StuffIt Expander has extracted all the files, close it and delete the file AppleShareFileServer2.sit (it’s possible that its name was shortened by the system, so that it’s called “APPLES~1”). You should now have a new folder called AppleShare File Server 2.0.1. Open it and you should find three files.
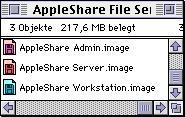
The most important file of those is the one called AppleShare Workstation.image. If you installed Disk Copy correctly, you should be able to open it by double-clicking. If not, open Disk Copy and manually open the image by selecting Load Disk Image… from the File menu and selecting the image file in its folder. In the upper box of the Disk Copy window you should now see information about the image file.
Now it’s time for a little trick. I’d bet that you don’t have a real 800 KB (Double Density, not High Density) disk, so you have to make the Macintosh think that your disk is only Double Density. You can do this by covering the right hole on the disk (highlighted in red) with a little piece of sticky tape. Important: The tape must cover both sides of the hole; otherwise it won’t work.
Now you can click on Make a Copy in the Disk Copy application. You’ll be prompted for a disk to copy onto. Insert the prepared disk. All data on it will be lost, and the disk will be initialized to 800 KB. When the process is finished, the program will eject the disk. Now close the program and insert the disk into the drive of the Mac with System 6 (in my case it’s the Mac Plus).
Note: If you exactly have System and Finder version 6 you can skip the next two paragraphs.
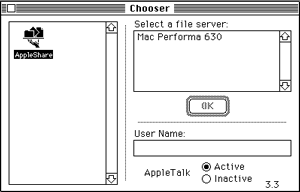
If you have System 6.0.7 or something like this but not exactly System 6, there are two ways of sharing files: (1) You can use the AppleShare Client disk as a boot-disk to copy files from your HD to the other Mac, or (2) You can create a new System folder on your System 6.0.7 HD and copy the system files from the disk to this folder. The first way is very simple to set up; you just have to insert the boot disk, boot from it, and open the Chooser. Activate AppleTalk and select AppleShare. If the other Macintosh is already set up as a file server, its name will pop up in the box (in my case the server’s name is Mac Performa 630). How to set up the other Mac as a file server will be described below.
The second way is a bit more complicated. If you just want a temporary connection—for example, only to backup your hard disk—you can create a new System Folder on your hard disk. Copy the contents of the System Folder of the AppleShare disk into the new folder on your HD. When you’re done, open the new system folder and highlight the System icon. Choose Set Startup… from the Special menu and select Finder in the upper part and Finder Only in the lower part of the windows. Click OK and reboot. If you want to set up a permanent connection, you can just copy all the files from the disk’s System Folder into your System Folder, so your old extensions will still be used. Important: If you do this, parts of your old system software will be permanently overwritten. You should back up the most important files (like your own System and Finder) on disks or different folders on your HD. Downgrading from System 6.0.7 to 6 can also cause some applications to run incorrectly or not at all.
If you’re using System version 6 you can do this: Boot from the AppleShare Workstation disk with your hard disk turned on (if it’s external). When the Macintosh is ready, you should see something like this:
Open the AppleShare disk and launch the Installer application. In the list you’ll see these items:
- AppleShare Workstation
- EtherTalk
- Macintosh II/Plus/SE Installation
Select AppleShare Workstation and the installation, which corresponds to your Mac, for example Macintosh Plus Installation if you have a Mac Plus. You don’t need EtherTalk because Mac Plus or equivalent computers don’t have Ethernet connectors. Note: The Mac calculates the space which will be freed or occupied if you remove or install the extensions. This may take several moments. Then select the desired drive at the right by clicking Drive and install by clicking Install. After this process is finished, you can eject the disk and restart.
Your System 6 machine is now set up completely.
Setting up System 7 or Newer
System 7 or newer should already be equipped with AppleShare client and server software, so there isn’t much to install. You just have to change a few settings.
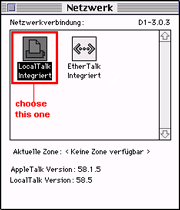
First of all you have to set up the connection, which should be used for engaging an AppleTalk network. Open the Network control panel from the Apple menu. In the new window, select the LocalTalk (Integrated) connector.
Now you have to create a new user account for the old Macintosh to identify and connect. Open the control panel Users & Groups. There you have two options: You can set up a guest account, which is not locked by any passwords and can be accessed from any Macintosh. This is the easiest way of setting up a user. Just double-click Guest, and activate the settings Allow Guests To Connect under file sharing, if you want the user to access files on your hard disk; and Allow Guests To Link To Programs to allow the user to let two applications communicate with each other, for example games. Remember, guest accounts don’t have any passwords!
If you want to create a new user with password-protection, go into the User & Groups panel and choose New User from the File menu. Then you have to give a name to the account. This is the name the client enters in order to connect to the file server. Then double-click the account. You can set a password for the account or leave the field empty. You can allow the user to copy files, to change their password, and to let their programs communicate with yours. If you set up a user account, you can now close this window and set up the server.
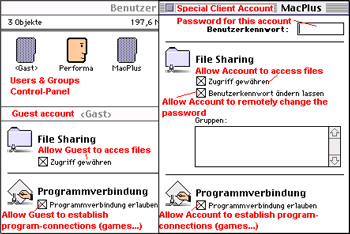
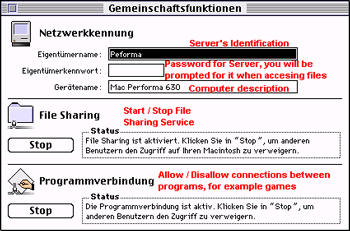
First you must identify the server itself, so open the Sharing Setup control panel. There you can define the server’s name, a password for the server, and a short description of the computer type. Under File Sharing you can start and stop file sharing, and under Program Connections you can start and stop connections under special programs. You may now close this window. Finally both systems are set up correctly!
Exchanging Files
Note: The settings you set until now don’t need to be changed anymore, except if you want to add new users. The next settings will be changed much more often as you will see. If you set up your Macs like I did it you will now have a server Mac (System 7 or newer) and a client Mac (System 6). That means that the Macintosh with System 6 can copy files from or to the Mac with System 7 or newer. The Macintosh with System 7 is not able to access the client Mac’s hard disk. That doesn’t matter, because when one Mac can copy from and to the other one, there is only one needed. If you want to establish connections over AppleTalk this limitation has no effect. The Macintosh with System 6 is no file server, but it can be a server for a game, for example.When you want to copy files between the two Macs, you must define a folder/hard disk of the System 7 Mac as “shared.” You can do so by simply highlighting it and then clicking on Sharing in the File menu. Then this window should pop up:
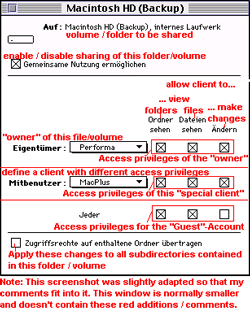
Here you can define the owner of this drive/folder, you can give one client special client rights, and you can change the rights of guests. You can enable/disable sharing of this resource and apply the settings to all folders which are included in the selected drive/folder. If you set up everything like you want it, close the window. In the box which pops up click Save to apply the changes. Note: The rights are applied every time you start your Mac. When you share the whole hard disk with all its subdirectories, it’s possible that the startup procedure takes approximately 1-2 minutes longer, so you should find a selection of folders you want to share instead of the whole drive. Or you create a folder called Shared which you share, and where you can copy everything to you want to share. That makes you sure that you only share files you want to share and startup is very quick.
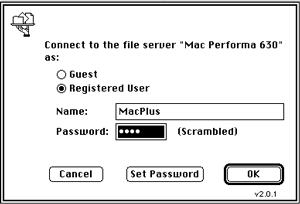
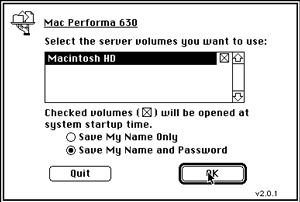
If you set up the system so that every folder you want to share is shared, you can now come back to your Mac with System 6. Open the Chooser, make sure that AppleTalk is activated, and select AppleShare. In the box which says Select a File Server should now popup the server. Select the server and click OK. You will be prompted to enter your username and password. If you set up the guest account, you can also click on Guest and you won’t need to enter any password. If the server allows you to, you can change your password by clicking Set Password.
Now you can see a complete list of shared resources from the server. You can mount volumes on the desktop by selecting them and hitting OK. If you want to mount multiple volumes, you can select them by Shift-clicking them. If you click a checkbox next to a volume, this volume will appear automatically on the next startup. When you’re ready, click OK.
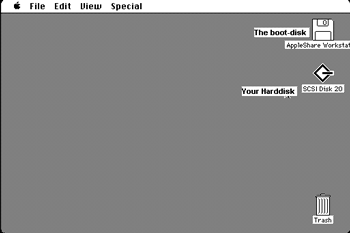
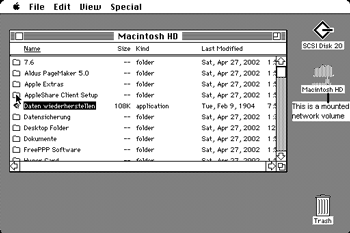
The selected volumes will appear on the desktop as if they were normal drives, except that they have a different icon. You can unmount a volume by simply dragging it onto the Trash. If you are allowed to make changes to the volume, you can use it as if it was a normal hard disk. If you wanted to backup your old hard disk to your newer one, you could do so by simply moving your hard disk icon to the mounted one. You’ll be prompted if you want to copy the contents into a folder on the mounted volume. You can proceed by clicking OK. Note: LocalTalk is rather slow. I think it has a throughput of around 20-30 KB/sec. Backing up my 20 MB drive took around half an hour.
Congratulations! You have connected your two Macs.
![]() Copyright © 2002 Nikolai Knopp,
pyrex@mapscene.de.
Copyright © 2002 Nikolai Knopp,
pyrex@mapscene.de.
Also in This Series
- Give Alert Sounds a Little Personality · March 2012
- Create Your Own iPhone Ringtones · February 2012
- Create Your Own Homemade Audio Book · December 2011
- Upgrade to Lion Painlessly · August 2011
- Make the Most of TextEdit · July 2011
- Using the Free Disk Utility on Your Mac · May 2011
- Making Use of QuickTime X · March 2011
- Making the Most of What’s Already on Your Mac · February 2011
- Making the Most of What’s Already on Your Mac · January 2011
- Complete Archive
Reader Comments (14)
The difference lies in how the wires in the cable connect to the connectors at the ends -- one kind connects pin 1 to pin 1, 2 to 2, and so on. The other uses some kind of "cross-over" pattern. I don't know which type is a "real" printer cable.
Isaac
For what it's worth, I'm reasonably sure that the ADB cables are the same as video Y/C (sometimes referred to as super-VHS) cables. If they're not, they're very close or identical to the same pin configuration, including the plastic tab.
I hope this article was helpful to you.
Nikolai Knopp
If your Mac refuses to boot from the provided images you should try to first boot an ordinary Version of System 6, which has no networking capabilities yet. If this is not successful either, it seems to me that you Mac has problems booting System 6, but I can't tell for sure because I have never seen or used a Mac IIsi.
To find solutions which are more or less independent from your current, specialized System Configuration you might try this page: http://home.earthlink.net/~gamba2/system6a.html There are many alternative solutions which might work easier for you.
Another very useful page regarding System 6 is http://www.euronet.nl/users/mvdk/system_6_heaven.html which also has a Network-Chapter under "Tips and Tricks". But the link provided for AppleShareClient 3.5 is broken, use http://download.info.apple.com/Apple_Support_Area/Apple_Software_Updates/MultiCountry/Macintosh/Networking-Communications/AppleShare_Client/ZM-AppleShare_WS_3.5.smi.bin instead!
Comments and suggestions? System 7 will do.
The newest MacOS I've been using for more than five minutes was OS8 - sorry ;-D
Perhaps someone else can help!
Greetings
Nikolai Knopp
I have a Apple plus, and I need a new refrence disk or boot disk for it. If anyone can help get one... Please e-mail it to me. Thanks in advance...
K-16
We realize that list may look daunting. There are lots of extras and updates there, too. Look for a line that reads Macintosh/System/Older_System/System_6.0.x/SSW_6.0.8-1.4MB and be sure to get both disks 1 and 2. A bit lower down is a 19-part set of disk downloads for System 7.5.3, if you'd like that instead. If you do go with System 7, be sure to browse through the list and also download all appropriate updates, such as 7.5.5 toward the bottom.
Just a question: is there a way to use the modem port as an Appletalk port so I can create a network of 3 or more macintoshs connecting 2 clients to one server?
There are also other ways?
Thanks!
thanks for your positive feedback :)
Regarding your question, I'm sorry but I have never really used AppleTalk except for the exact setting which I described in this article. Therefore, I cannot give any advice on connecting more than two Macintoshes using the built-in serial ports. If I remember correctly, I once saw "AppleTalk"-cables which had a small box in the middle to which one could connect one more cable to add another machine using a regular serial cable. But this was ages ago and I did not have a clue about networking back then. But perhaps other people reading this know more about that ;)
Anyways, good luck with your experiment :)
Cheers,
Nikolai
Add A Comment