FileMaking
Getting Relational
FileMaker is described as a relational database. Most of us have at least an intuitive idea of what a database is. While we covered the relational aspect in some detail in the first column, we’re going to look more closely at its meaning here. Some of what will be presented here is theoretical, but it will have practical applications, and the only portions of relational theory that we’ll cover will be those directly applicable to FileMaker databases.
What Is a Relational Database?
Long ago in the neolithic era of computing (1969), Edgar Codd wrote an article describing the relational model of database structure that is the basis of modern relational databases. Most modern professional grade database managers, such as MySQL and FileMaker, have their roots in this paper and later works by Mr. Codd. The word relation originates from the mathematical concept of a table, although one could also think of relation as stemming from the idea that the data is built around relationships between things.
The basic idea of Codd’s relational model was that data should be broken into tables, and tables are made up of columns and rows. In FileMaker parlance, rows are records and columns are fields within those records. Tables and fields are chosen based on a process of normalization, which is designed to ensure that the database is properly broken into tables based on the elimination of duplicate data, and to ensure data integrity.
If, after reading this article, you’re interested in delving further into the details of relational database design and normalization, I can recommend a book that helped me quite a bit some years ago, Relational Database Design Clearly Explained by Jan L. Harrington. The link will take you to Amazon’s page for the edition I’m able to recommend, as I’m unfamiliar with the second edition.
Normalization
Normalization is a rather theoretical and complex topic, but in regard to building FileMaker databases, it can be broken down into the following guidelines:
- Each record in a table should be uniquely identifiable.
- Each field in a record should be dependent on only the record in which it exists.
- Each field in a record should be uniquely determined by the record it exists in.
- Each field in a record should store a single piece of information.
- Each field in a record should appear only once.
I’m playing loose with normalization terminology and definitions, but this is the basic idea behind normalizing your data to what’s called the fourth normalization form. By following these rules, you help to ensure that your database is structured so that data isn’t repeated and when an attribute of one record changes, it’s properly shown in all relevant areas of the system.
Example Design
For the most part, you can design a database without regard to what you will be using to build the database. For the moment, that’s what we’re going to do. After we’ve designed the database, we’ll create our design in FileMaker.
Our example database will store a collection of books. Information we want to track about each book will include the title, author, publisher, location, and other items. We’ll begin with a single table and create new tables as we apply the rules above. Some portions of the structure of our database may seem contrived, but they will serve to illustrate general principles.
Obviously, the first table we’ll need is Books. The Books table will begin with the following fields:

Let’s apply the first rule above. Are records within this table uniquely identifiable? Another way to ask this question is, does the possibility of duplicate records exist? As far as the database is right now, yes. It’s conceivable that we could have two copies of a book stored in the same location, and we would have no way to tell within the database which book we’re looking at.
The most common solution to this is to add a field whose sole purpose is to uniquely identify a record. This is sometimes called a primary key field or a serial number. In this case, we’ll add a field called Book ID, which we will define to have a unique value for each record. FileMaker has mechanisms for ensuring that this is the case, as we’ll see when we implement our database.
There are other solutions to the problem besides using a dedicated key field. One that is commonly used is to find a field that you’re already using that uniquely identifies the record, such as a product number or perhaps a combination of fields that uniquely identify a record, such as the person’s name (calculated from a first, middle, and last name). However, I nearly always opt for a key field that serves no purpose other than identifying a record. There are a number of reasons for this, but I think the most important one is that it’s very useful to have the key field be not only unique, but static. A person’s name may change, while in order for relationships between tables to have integrity, key fields should not. Additionally, unless there’s overwhelming need, I do not display the key field to the end user, using it for the background programming I build instead.
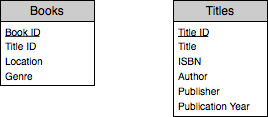
Given what we’ve done to the Books table to conform to the first rule, our table now looks like this (Book ID being underlined to indicate that it is the primary key field):

Let’s move on to the second rule. Is each attribute we are tracking dependent only upon the record in which it exists? No, because the author, publisher, title and publication year all depend on the ISBN number. If we have two copies of a book, we’ll be storing this data twice and if it’s been entered incorrectly in both records, updating one of them will not update the data in the other record.
Solving this problem will require the addition of another table, which we’ll call Titles. We’ll move the ISBN, Title, Author, Publisher, and Publication Year fields from Books to Titles, and add a new field to the Books table to indicate which title a book belongs to. We’ll also add a Title ID field to the Titles table as we did with the Books table. As a general rule, always include a primary key field in each of your tables.
If you’re thinking that the ISBN number could have been used as the primary key, you’re correct. It satisfies the basic requirements of a primary key field in that it should be unique, given a specific title, and therefore will uniquely identify a record. A valid reason for a dedicated primary key field in this case is that if we use the ISBN number and then have books that reference the ISBN number, but someone incorrectly entered and then corrected the ISBN number, the link between the book and the title would be broken (as you’ll see later when we build the relationships in FileMaker).
As our database stands now, it already satisfies the third rule, so let’s add a feature, first in a manner that will break the third rule, and then correcting the structure to conform to it.
Perhaps we’d like to track further information about the publisher, such as the publisher’s address. Adding this information to our Titles table alters the structure to appear as follows:
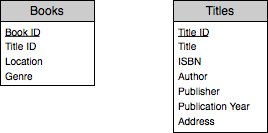
Now we have the ability to track the address of a publisher as well as the other information about a title. The problem with this is that it breaks the third rule. The third rule says that a field in a record should be uniquely determined for that record, and this isn’t the case with the address. The title uniquely determines the publisher, and it is the publisher that uniquely determines the address. Therefore, we need another table, this time for Publishers, and move the publisher name and address fields from Titles to Publishers, adding a Publisher ID field to Titles so that we can track which publisher is associated with a title.
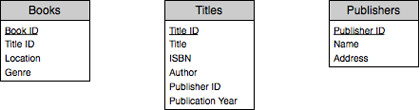
At first glance, our database seems to satisfy the fourth rule, but closer inspection shows otherwise. For example, the name of an author is actually made up of the first name, middle name, and last name, three separate pieces of information. Also, the address field in Publishers is probably made up of a street address, possibly a suite number, the city, state, and zip code (we’ll limit ourselves to US addresses for simplicity). To correct this, we break up both of these fields into their respective components.
While it may seem overkill to break a single name into multiple components, as in the case with the name and address, it will make future development easier. For example, without breaking the name into its components, it would be difficult to sort the titles by author last name, and leaving the entire publisher address in a single field would make it difficult to search for all the publishers within a specific state.
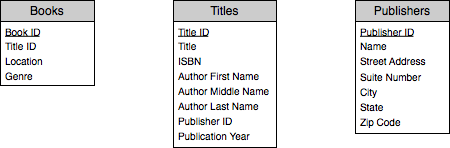
With these changes, the Publishers table now violates the third rule! A publisher uniquely determines a zip code, but the zip code will determine the city and state. Proper normalization will require that we create a zip codes table to correct this.

Our final rule, that each attribute appear in a record only once, initially seems satisfied as the database currently stands, until we consider that a book could be written by multiple authors. A common way for novices to solve this is to place multiple versions of a field in a database, so that we would have fields for Author 1 First Name, Author 2 First Name, etc. This presents two problems. First of all, we limit ourselves to the number of authors that can be assigned to a title. If we add three sets of author name fields and come across a title with four authors, we have to edit the database design, and again when we come across one with five authors. But we also have the problem that when we have many titles by the same author, we’re entering that author’s name many times throughout the database.
Therefore, we should break the authors out into its own table. But we need to go a bit further than this. Not only may a single title be written by multiple authors, but a single author may write multiple titles. All the relationships spoken of thus far have been one-to-many (a single title can have many books, a single publisher can have many titles, etc.). In this case, we’re working with a many-to-many relationship, and that requires an extra table, often called a join table. So we end up not only adding an Authors table but an Authors Titles table to track which authors have worked on which books. Our structure becomes as follows:

Breaking the Rules
We now have our tables designed to conform to all of the rules outlined above. At this point, I’ll mention that the rules are not set in stone. There are times when you will break the rules for some specific purpose, but you should know the rules and why you’re breaking them before doing so.
As an example, perhaps the overhead of dealing with a Zip Codes table is more trouble than you think is necessary. In that case, you might decide to keep the city, state and zip code fields in the Publishers table instead. Doing so is fine, and FileMaker will allow it. The point is, know why you’re doing so and be aware of the potential drawbacks (duplicate data entry and therefore a possible lack of data integrity).
Another example, again from the Zip Codes table, is the primary key field we used. In this case, you might not want to use a dedicated primary key field, as you may decide that the Zip Code field itself will adequately serve as a primary key. Or, perhaps you note that a combination of Author ID and Title ID in the Author Title table can serve as a primary key, and remove the Author Title ID field. Again, doing so “breaks” the rules, but for an arguable reason that may be quite valid.
Normalization Complexity
While it may seem at first that applying the rules of normalization is time-consuming and tedious, it eventually becomes second nature. Honestly, I haven’t thought about the precise normal forms for quite some time. After you’ve applied the normalization rules to a number of database systems, you’ll be able to create a database design that is normalized without having to think about it. It will simply be obvious that, for instance, Authors should be its own table and will require a join table to properly store how authors and titles are related.
Designing Relationships
Now that we have our tables and have confirmed that they conform to the normalization rules, we can begin to design the relationships between them. This will allow us to make use of each table’s data within other tables. For example, although we have a Books table, the title of the book is actually stored within the Titles table. We have a Title ID field in the Books table to enable us to link the tables together so that when viewing a book record in FileMaker, we’ll be able to see the title of the book, even though it’s not actually stored in the Books table.
The design of relationships is often best done graphically, using boxes to represent tables and lines to demonstrate the links between tables. I use OmniGraffle for this, as it has built-in arrowheads to serve this purpose, but any program that allows simple drawing will do, even FileMaker itself, using its built-in layout tools. And, of course, there’s always the low-tech paper-and-pencil solution.
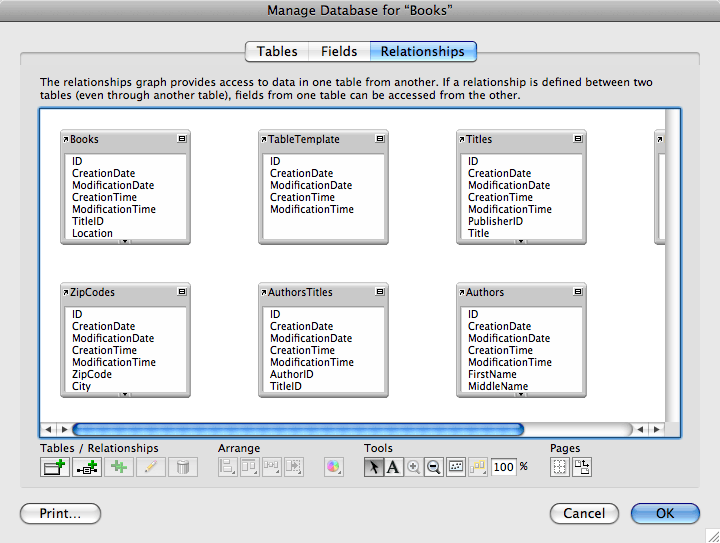
First, let’s show the diagram, which is called an Entity Relationship Diagram, or ERD, for the tables we’ve designed.

What we’re showing here are the basic relationships between each of our tables. For example, you can see that the Books table is related to the Titles table based on the Title ID field in both tables. This means that to link a title to a book, we find the Title ID that uniquely identifies the title we are interested in, and assign this value to the Title ID field in the Books table.
A further step in database design is to use the lines connecting tables to indicate not only that there is a link between the tables, but what sort of link it is. Links can be described in at least two ways (there are more ways to describe links which we won’t get into yet). The first way is how many records in one table link to how many records in another table. As you might guess, this breaks down to three possibilities: one-to-one, one-to-many and many-to-many.
One-to-one is very rare, as generally it means that two tables should be combined into a single table. As an example of this type of relationship, however, perhaps you have a table of People and a table of Authors. All of the information you track for a person you also want to track for an author, but you don’t want to keep the author-specific fields within the People table. You could create the two tables separately, and include within the Author table a Person ID field. This would be a one-to-one relationship. An author is related to a single person and a person is related to, at most, one author.
One-to-many is the most common type. Most of the relationships we’ve discussed fall into this category. A Title can have many Books, but a Book has only a single title. A Zip Code can apply to many Publishers, but a Publisher is assigned a single Zip Code. From a practical standpoint, one-to-many relationships are the only ones you’ll probably work with, as when building an actual database, one-to-one relationships are rare and many-to-many relationships are broken into a pair of one-to-many relationships.
The relationship between titles and authors is our example of a many-to-many relationship. An author can write many titles and a title can be written by many authors. However, in our design, we broke this many-to-many relationship into a pair of one-to-many relationships via the Author Title table. The sole purpose of this table is to facilitate this many-to-many relationship via two one-to-many relationships. Any time you have a many-to-many relationship, you’ll need to design it in a similar manner.
Entity Relationship Diagrams offer a standard set of arrowheads to help indicate the type of relationship. Here’s our ERD with the addition of these arrowheads. The crows feet on one side of each of the lines indicates which of the tables is the “many” in the one-to-many relationship.

Another useful attribute of a relationship to document is which relationships are required and which are optional. For example, for our purposes, it doesn’t make much sense to have a Book without a related Title, so each Book must have a related Title. On the other hand, it’s possible to have a title in our database without a corresponding book. Perhaps it’s on our wish list and we haven’t bought it yet. So a Title may have one linked Book, many linked Books, or no linked Books. Our ERD now looks like this after considering the same circumstances for the other relationships.

Here’s how to interpret the symbols. A circle with crows feet means that the table linking to the connected table can have zero, one, or many related records. A line with the crows feet means that there must be at least one related record, but there could be many. Two lines mean that there must be a related record, whereas a circle with a line means that there may be a related record, but need not be, although if there is a related record, there is only one.
Concretely, a Title may have a related Book, but need not. A Book must have a related title. Alternatively, a Title may have zero, one, or many related Author Title records (perhaps we don’t know the author). Similarly, a Publisher may have a Zip Code, but need not have one (perhaps we don’t know the publisher’s address).
At this point, we’ve completed the initial design, and can move forward with implementing the design.
Standards and Conventions
Before we get into how to implement our design in FileMaker, a word about standards and conventions. Standards, in this context, means the naming and organization conventions for FileMaker objects such as fields, relationships, layouts, scripts, etc.
What you’re about to see is one individual developer’s standard when building a database. The standards I use work for me and have evolved extensively while I’ve been working with FileMaker. One’s choice of standards sometimes become a religious war between developers. The point of naming and organization conventions within FileMaker is consistency within an application. FileMaker systems can get quite complex, with dozens of tables, each with dozens of fields, layouts, and scripts, resulting in hundreds, if not thousands, of named objects.
To give you an example, we’ve seen that each table should have a primary key field. My own convention for naming this is ID (short of identifier). If a table needs to have a relationship to another table, and therefore a field for that table’s primary key (called a foreign key, such as the Title ID field found in the Books table), I simply prepend the other table’s name to the field name, as in TitleID. An alternative convention is to prefix the field name with pk_ for the primary key, as in pk_book_id, and fk_ for foreign keys, resulting in fk_title_id.
The point is not that one is better than the other. Use whatever works for you in the end. The point is, be consistent, at the very least within a single system, and ideally across all the systems you build. I won’t be explicitly pointing out all of the conventions I use, as they are going to be pretty obvious as we move forward.
Implementing the Design
We have our design, so now we’re going to build the system we’ve designed in FileMaker, creating the tables and fields. I’ll be using FileMaker Pro 9 Advanced as I perform the necessary actions, but for the time being, everything mentioned should work almost identically in FileMaker 7, 8, or 8.5.
Launch FileMaker. If you’ve been using FileMaker for a while and have turned off the Quick Start feature, you’ll get a standard save dialog box. If you get the Quick Start window, click the “Create empty database” radio button and then click “OK,” at which point you will then see the standard save dialog box.
Select where to store the database, and name the new file “Books.fp7". FileMaker will create the empty file, add a single new table to it called Books (after the name of the file), and bring you to the Manage Database window where you can create fields for this table.

We’re simply going to use the fields we’ve come up with from our design. The first one is the primary key field. Click in the Field Name text field and type ID From the “Type” pop-up menu, select Number (or press Command-N). If you like, enter a comment to the effect that this is the primary key field for this table. Finally click “Create” or press Return.
Since this is the primary key field, we need to change its behavior to ensure that each record gets a unique value. Click the “Options” button.
By the way, if you’re more comfortable using the keyboard to navigate within the interface, you can get to the options in an alternate route. After creating the field, you’ll find yourself back in the “Field Name” text field. Pressing Shift-Tab will take you to the field list, with the newly created field being highlighted. Pressing the space bar at this point will bring you to the “Options” window.
Click the checkbox labeled “Serial number,” leaving the default options as “Generate: On creation,” “next value” as 1, and “increment by” also as 1.
This means that each time a record in the Books table is created, the system will automatically assign the next value listed here to this field, and increment the next value by 1. So the first time we create a record, this ID field will have a value of 1, the second time, a value of 2, and so on. There are other ways to populate a primary key field, but this is the most straightforward and simplest.
Also remember that a key field should not change its value. Therefore, to protect against this, click the checkbox labeled “Prohibit modification of value during database entry.”
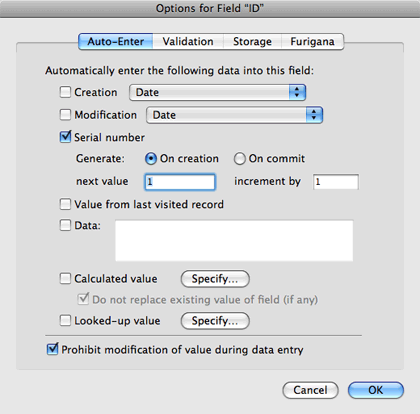
Additional precautions can be taken to ensure that each record has a unique value and that there are no blank values. Click the “Validation” tab in the “Options for Field” window. Click the radio button labeled “Validate data in this field: Always” and uncheck the checkbox labeled “Allow user to override during data entry.” Click the checkbox for “Strict data type:,” leaving the pop-up menu option next to it as “Numeric Only.” Check the boxes for “Not empty” and “Unique Value.” Click “OK” to save your changes to the field options.

None of these should ever be an issue given the options that we specified in the “Auto-Enter” tab, but they do provide an extra level of integrity upon the ID field. Also, if we end up importing records from another source, this additional validation will help us be sure that the imported data doesn’t break the integrity of our existing data.
Create another field called TitleID, also a number field. This one doesn’t need any further options set.
Now create two text fields, one for Location and one for Genre. You can set the field type to Text by either selecting “Text” from the “Type” pop-up menu or by pressing Command-T. Neither of these need to have any options set.
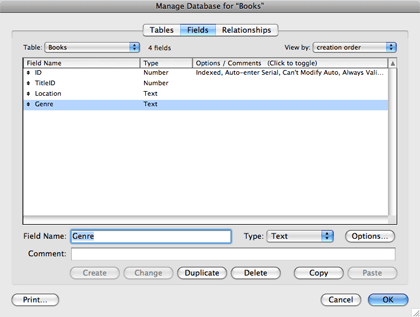
A few more fields will be useful later, and it’s best to create them immediately. These are utility fields, allowing simple record tracking when a record was created. We could postpone their addition until we see an actual need for them, but by that point it may be too late, as it may be after many records have already been created, and adding the fields at that point would leave those existing records without the creation or probably the modification information.
The first field is CreationDate. Specify that it’s a Date field by selecting “Date” from the “Type” menu or pressing Command-D and set its options to auto-fill with the creation date. Prohibit the modification of this field’s value and set the validation to always validate, disallowing the user to override the data, and check the box to ensure the field is not empty. Then click “OK” to save the changes to this field.

Create the field for ModificationDate, with identical options to the CreationDate field, but this time setting it to auto- enter the modification date.

Create two additional fields, CreationTime and ModificationTime, similar to the date fields, but with the “Type” as “Time” (use Command-I to set a field type to Time via the keyboard), and the appropriate auto-enter options.
I find it useful to keep the utility fields next to each other. You can reorder the fields in the list by dragging the double-sided arrow to the left of each field name. Once you have done this, your field list should look like this.

We have eight fields in our Books table, and five of them should be in all of our tables. So the next thing we’re going to do is duplicate the table we have built, remove the Book-specific fields and duplicate this table template for the rest of our tables.
Click the “Tables” tab and make sure the Books table is selected. Click the “Copy” button or press Command-C. Either click the “Paste” button or press Command-V. You should see a new table called Books 2. Highlight the table name in the field at the bottom of the window and rename it TableTemplate, clicking the “Change” button after doing so (or, from the keyboard, press the Tab key and then the up arrow key, pressing Return to accept the default choice to save the change). Double-click the TableTemplate table. Click on the TitleID field, and then Command-click on Location and Genre. Click the “Delete” button or press the Delete key on your keyboard to remove these fields, and then click the “Delete” button in the confirmation dialog that appears.
Return to the “Tables” tab and duplicate the TableTemplate table by copying once and then pasting five times, renaming the resulting new tables Titles, Publishers, ZipCodes, AuthorsTitles and Authors. Reorder the tables so that the TableTemplate table appears at the bottom, as it may prove useful to have if we add more tables in the future.

On a side note, this is one reason I always name my primary key field ID. Creating a table with the default fields becomes trivial by doing so.
Copying and pasting tables in this manner is considered an import to the FileMaker application (you may have noticed the “Import” button also found in the “Tables” tab, which allows you to import a table from another file). When FileMaker performs an import of tables, it keeps a log of the progress in case there are problems. Therefore, if you check the folder that stores the “Books.fp7” file, after pasting the tables, you’ll find a new file called “Import.log.” Go ahead and open it if you’re curious, but you can trash it with no ill effects.
Let’s create the table-specific fields in the rest of our tables. Double-click on the Titles table and create the fields for PublisherID (number), Title (text), ISBN (text), and PublicationYear (number).

To go directly to the Authors table, select it from the “Table” pop-up menu at the top left of the window. Create fields for FirstName, MiddleName, and LastName (all text fields).

Move on to the AuthorsTitles table, creating fields for AuthorID and TitleID, both number fields. In the Publishers table, create the fields for ZipCodeID (number), Name (text), StreetAddress (text), and SuiteNumber (text). Finally, move on to the ZipCodes table, creating the fields for ZipCode (text), City (text), and State (text).
Some Explanation
For most of the fields we’ve created, the field type is obvious. An author’s first name is obviously storing text. But what about the zip code? These are numbers, so perhaps the ZipCode field in the ZipCodes table should be a number field.
While zip codes are represented by digits, they aren’t numerical data. One would never perform mathematical operations on a zip code, and some zip codes begin with zeros, which would be removed in the display of zip code data if we stored it as a number field. The basic criteria for storing data as a number is whether you anticipate the possibility of performing mathematical operations on the data. Zip codes fail this test, while the year a title was published satisfies it. One could imagine wanting to calculate how long it’s been since a title was published.
What about our primary key fields? One wouldn’t normally perform mathematical operations on these key fields, so why store them as number fields? Simply put, it doesn’t matter for storage, but for sorting. If I ever want to sort these fields by the order in which they were created given their primary key value, storing their values in number fields will give the proper results. Storing them as text would do things like sort the 100th record before the second.
Table Occurrences
While creating these tables, you may have noticed the column in the Table tab labeled “Occurrences in Graph.” Each new table created what’s called a table occurrence. We’ve not yet created any relationships, so the utility of these is thus far limited. You can take a look at them by clicking the “Relationships” tab.
For now, we’re done defining our database, so click the “OK” button to save all of these definitions. After doing so, you’ll find that in addition to the automatic table occurrence creation, FileMaker has also created automatic layouts for each of our tables, each with all of the fields we defined for each table. It also created the first record in the Books table because that was the first table created.

At this point, we have a perfectly usable database. We can create records for any of our tables and move between tables and records using FileMaker’s built-in interface elements (such as the layout menu shown above or the book icons to move between records). However, linking data between tables must be done manually, which would prove difficult and tedious as the database grows.
Next time, we’ll refine our database, using the layout tools to make it look better and using other features of FileMaker to make data entry easy, especially when linking records in one table to those in another.
![]() Copyright © 2008 Charles Ross, cross@atpm.com. Charles
Ross is a Certified FileMaker 7 Developer and the Chief Technology
Officer of Chivalry Software, LLC, a company specializing in
custom database, web and automation software and publisher of
Function Helper, a
FileMaker calculation debugging tool. He was a contributing writer
and the technical editor for The Book of FileMaker 6 and has
contributed to ISO FileMaker Magazine and Macworld in addition to his series on
AppleScript for ATPM.
Copyright © 2008 Charles Ross, cross@atpm.com. Charles
Ross is a Certified FileMaker 7 Developer and the Chief Technology
Officer of Chivalry Software, LLC, a company specializing in
custom database, web and automation software and publisher of
Function Helper, a
FileMaker calculation debugging tool. He was a contributing writer
and the technical editor for The Book of FileMaker 6 and has
contributed to ISO FileMaker Magazine and Macworld in addition to his series on
AppleScript for ATPM.
Also in This Series
- Incremental Progress · November 2008
- Getting Relational · April 2008
- FileMaker 9 · March 2008
- FileMaker 8.5 · September 2006
- Script Parameters and Results · July 2006
- “Real” Programming with FileMaker · June 2006
- Text Parsing With FileMaker · May 2006
- Welcome to FileMaker 8! · November 2005
- Common Functions · October 2005
- Complete Archive
Reader Comments (0)
Add A Comment