Photoshop for the Curious
A Tutorial on Resolution
Want Some Wallpaper?
Where was my head last month? I had totally intended to set up the final version of the image used in last month’s tutorial as a full-sized image and offer it as a desktop wallpaper image. My bad. My penance will be to offer it this month at enough resolution to natively fill a 30″ Apple Cinema Display. Bon appétit.
Tiny Little Dots
Time to get on with it. This month, I hope to clear up the confusion many have with the concept of resolution. Even if I had ten hands, I would not have enough fingers to count the number of times I’ve been sent a low resolution photo that is intended to go in print from a person who claims it is large enough. “It’s full size on my screen, so it should be large enough,” they might say.
Wrong answer.
As we’ll explore this month, the resolution of your monitor is far lower than the resolution generally printed on paper. Even if you’re fortunate enough to be using a 30″ Cinema Display, an image that fills the entire display is most certainly not suitable for a 30″ print. In fact, I’ll demonstrate why this size of an image is actually only suitable for something in the neighborhood of a 9″×6″ print. Yes, still very large, but not as large as your display. This is confounded further by the fact that most everyone from whom I received some version of the quote above was probably using a 1024×768 monitor—a resolution barely adequate for a 4″×3″ print! A little bigger than 3″×2″ is all I’d really plan on at that resolution.
What Is Resolution?
I’ll start with an image that is 1,600 pixels wide and 1,200 pixels tall. This is a size setting you might commonly find on a digital camera. Seems like a lot of pixels, doesn’t it. Exactly how big would this shot be on paper?
First, what does the 1600×1200 mean? Well, there’s a reason why “sixteen hundred by twelve hundred” can be represented as 1600×1200—because the “×” also means you can multiply the numbers. If you do the math, you get 1,920,000. In other words, a 1600×1200 image is a little less than two million total pixels—or a 2 megapixel camera. Suddenly, 1600×1200 doesn’t seem so big any more, does it?
Regardless whether you refer to 1600×1200 or 2 megapixel, you’re talking about the total number of pixels in an image. But this, alone, is not enough to definitively say how big the image will print. Note that I said earlier that 1600×1200 “seems like a lot of pixels” and not “seems like a lot of resolution.” The total number of pixels in an image is not its resolution.
Here’s the surprise: our image can be any resolution and remain 1600×1200! Resolution has nothing to do with the total number of pixels in an image and everything to do with how large or small the pixels are represented. In other words, resolution specifies the amount of linear space a certain number of pixels should occupy.
Now would be a good time for a visual. I have a photo open that is 1600×1200 pixels in size. I’ll head to Photoshop’s Image menu and select Image Size.
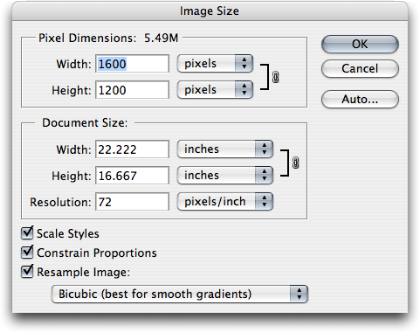
Photoshop’s Image Size menu.
In the Pixel Dimensions section, we see confirmation that my image is 1600×1200 pixels. But what’s that in the Document Size section? More than 22 by 16 inches? Can a 2 megapixel camera really print that big?
Well, yes and no. Look at the third setting in the Document Size section. The Resolution is set for 72 pixels per inch. This number makes all the difference in specifying the size of your image, and setting it correctly depending on the final destination of your image is key.
I said above that an image’s resolution defines how many pixels occupy a certain amount of space. Time for some more math. An image’s Document Size is calculated simply as the Pixel Dimensions divided by the Resolution. In this case, 1,600 divided by 72 equals 22.222, and 1,200 divided by 72 equals 16.667.
What’s happening is, we’re specifying that 72 pixels should fit in exactly one inch of space. So let’s see what happens if we change the Resolution value.
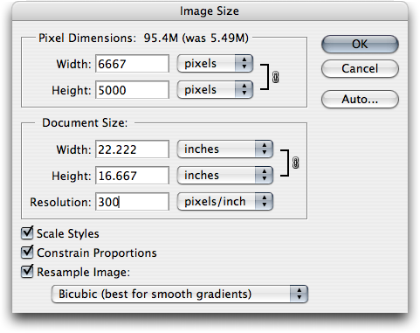
6667×5000 pixels? What happened?
In this screen shot, the Resolution has been changed to 300. The Document Size is still 22.222×16.667 inches, but look at the Pixel Dimensions. That can’t be right, can it?
What happened is that the current settings in the Image Size menu locked the Document Size and resized the image (the Pixel Dimensions) to accommodate the changes. In this case, the image has been enlarged by almost 425%. Enlarged? But the Document Size is still the same!
Not exactly. Yes, the width and height are the same, but look at the resolution. We’re now at 300 pixels per inch. By increasing the resolution while also keeping the Document Size the same, Photoshop has had to add a lot more pixels to the image to account for the fact that we told it to put 300 pixels in every inch instead of only 72. This is represented by the increase from 1600×1200 to 6667×5000.
So where do those pixels come from? In simple terms, Photoshop invents them. Seriously. You’ve been told before, haven’t you, that it’s bad to enlarge a digital photo? This is the reason why. In order to fill up the extra pixels, Photoshop has looked at all the neighboring pixels and has guessed, based on math, what additional pixels are needed. If you enlarge an image exactly 200%, you now have four pixels for every original one. However, it doesn’t mean you’ve now got four pixels worth of detail that previously only had one. Rather, it means that one pixel has been blown up to the space of four pixels. Time for another visual.

The individual pixels at 72 pixels per inch.
The above screen shot is zoomed in to look at the individual pixels of a sample image. Each square block (such as the white block in the exact center) represents a single pixel. Now let’s see what happened when the Resolution was changed to 300 and the Pixel Dimensions increased to 6667×5000.

The same image, enlarged.
The same basic shape is visible, but Photoshop has attempted to smooth it out by guessing what additional pixels were needed to make up the difference. Instead of just a single pixel for the white spot in the center, that spot is now represented in approximately 20 pixels (four wide and five tall). You can see the smaller squares throughout the image. We’ve made it higher resolution, but we’ve also made it very blurry and pixelated.
The same problem would happen if you left the Resolution at 72 pixels per inch, but increased the Document Size values.

Still 6667×5000, but at 72 pixels per inch, we’re up to more than 92 inches wide!
How To Change Resolution With Pleasing Results
It takes just two steps to adjust an image’s resolution in a way that doesn’t cause these problems, while simultaneously revealing how large you can print your image on paper.
The first step is the really easy part. Simply uncheck the Resample Image checkbox. When you do this, you’ll notice that you can no longer adjust the Pixel Dimensions and that the black lines on the right side of the Document Size section have expanded to point to Width, Height, and Resolution (the previously only pointed to Width and Height, assuming the Constrain Proportions checkbox was on). This means those three items are now linked. If you change any value, the others will automatically update to compensate for your change.
Let’s see what happens when we change the Resolution to 300 this time.

More realistic for printing.
With the Resample Image checkbox turned off, the Pixel Dimensions remain at 1600×1200. This means we are in no way damaging the available information in the original image. When not resampling, you can adjust the Document Size as much as your whim desires, and nothing will harm the image.
Notice, however, the Width and Height values when the Resolution is changed to 300. They’re now showing 5.333 inches wide and 4 inches tall. Using the same math as above, we discover that 1,600 divided by 300 equals 5.333 and 1,200 divided by 300 equals 4.
Alternatively, you can specify that you want the image to be only three inches wide. Entering a Width of 3 automatically changes the Height to follow proportionately at 2.25 inches, and you have a resolution of 533.333 pixels per inch. The smaller the Document Size, the more Resolution when resampling is turned off.
You’ll remember, at the beginning of this month’s column, I said I would demonstrate that the resolution of a 30″ Cinema Display is only suitable for a much smaller print. If the Pixel Dimensions are 2560×1600 (the dimensions of the 30″ Cinema Display), the Document Size is 35.556 inches wide and 22.222 inches tall at 72 pixels per inch. But, at 300 pixels per inch, the same Pixel Dimensions only give 8.533 inches of width and 5.333 inches of height.
And this brings us to step two. How do you know what value the Resolution should be, and why have I been talking about 72 and 300 pixels per inch up to this point?
In general, consumer-level digital cameras and most computer displays work at 72 pixels per inch, but this is beginning to change. Many semi-professional and nearly every professional digital SLR camera specifies its images at 300 pixels per inch. Remember, as we’ve seen above, you can change the resolution of an image without changing the total number of pixels. In other words, 6 megapixel is still 6 megapixel regardless whether you’ve defined it as 72 or 300 pixels per inch.
In addition, many computer displays are also working at a tighter, more detailed resolution—often 96 or more. You probably heard how Apple boasted about the iPhone being 160 pixels per inch. This makes for a much more crisp display of graphics than most standard computer monitors working at 72 pixels per inch.
There’s a very good reason why 72 pixels per inch is something of a baseline, but it would take another long article to fully explain it. Suffice to say that 72 pixels per inch matches perfectly with graphic design measurements set in place long before computers came around—measurements which define 72 points as equal to one inch. Yes, that absolutely does mean that six lines of 12 point type should fit in one inch of height. Well, that doesn’t account for something called leading, but let’s not bother with that.
The other resolution value I’ve been using, 300, is slightly arbitrary, but is used because it’s a nice, even number to use as a reference point. It turns out that when a digital device prints a photo on paper, your eye shouldn’t be able to discern the tiny pixels if 300 of them are squeezed into one inch. In reality, depending on the type of printer or press being used, you can often get away with less resolution. Most people can’t see pixelation even at 200 pixels per inch. Not that I want to brag, but in high quality glossy inkjet prints, 200 pixels per inch is about where I’m just able to detect slight pixelation. But, of course, I know what to look for.
So, by doing the math, and assuming you have a 3.1 megapixel camera that produces images that are 2,048 pixels wide and 1,536 pixels tall (3,145,728 total pixels) at 300 pixels per inch, you’re good for a print that is 6.8 inches wide and 5.1 inches tall. Of course, a photo lab technician would probably tell you that a 3 megapixel camera is perfectly fine for an 8×10 print. Well, at 200 pixels per inch, they’d be right, and you’d probably be perfectly happy with the quality. But for best results, you’re better off assuming 300 pixels per inch.
DPI or PPI?
I suppose 300 pixels per inch is something of a magical number for photo resolution. A lot lower and you begin to see blurry pixelation. Conversely, a lot higher is sort of a waste. You might be thinking that if you have a 6 megapixel camera (10.25 inches by 6.8 inches at 300 pixels per inch), you could ramp up to 600 pixels per inch for a super detailed 5×3 inch photo. In some ways, you’d be right, especially when you consider that inkjet printers these days are running 1200 DPI and higher.
Wait, what’s that? What is “DPI”?
Aha, young grasshopper. You’ve entered the realm of dots per inch!
Let’s get a very small, but very important, fact straightened out right now. Dots per inch (DPI) is not the same thing as pixels per inch (PPI). You may only just now realize that I never once in this article prior to this paragraph mentioned DPI. Common misconception will suggest the two as meaning the same. As we’ve covered above, pixels per inch refers to the individual single spots of color that make up an image. Dots per inch, on the other hand refers to ink on paper. You’ll generally find that the available DPI of a printer is far higher than the PPI needed for a pleasing image.
We’ve already established that 300 PPI is a bit more than sufficient (but an easy number to work with that isn’t too much overkill) for printing images, even if the printer is capable of a DPI that is higher. In other words, the PPI of an image does not have to match the DPI of your printer. Having the extra DPI resolution on a printer is a benefit for graphic images (not necessarily photos) with extremely fine detail—much finer than needed for a photograph. Even many typefaces with ornate serifs and flourishes look a lot better. Most people can easily see the difference in quality of standard Times New Roman on a 300 DPI printer and a 600 DPI printer.
So, Do I Really Need More Than 3 Megapixels in a Digital Camera?
Knowing now that a 3 or 4 megapixel camera is completely adequate for typically sized photo prints, why would anyone need more megapixels?
The answer for most people is—you don’t need more. But when I say “most people,” I’m talking about those who don’t do anything to their photos other than take them to a photo lab. They’re content with a print that, more or less, matches the framing they originally shot with the camera.
However, if you’re someone who likes to shoot a little wider just to make sure you don’t miss something, and then crop your photo later, this is where having the extra pixels are a benefit.
To illustrate, let’s start with a photo of a USSOCOM paratrooper from last May’s desktop photos. Suppose you took this shot with a 3 megapixel camera and you want to make a print cropped close to the paratrooper. Let’s see what happens when we crop and enlarge just the paratrooper to a 4×6 inch shot and look at it on the computer screen.
Enlargement from a 3 megapixel camera.
Remember, 300 pixels (one inch in print) is obviously going to display much larger on a 72 PPI computer display. I’ve also taken the above screen shot with the image showing at 400% actual size so you can see the pixel resolution. It’s very blocky.
But now, here’s a sample of what the exact same shot would look like if it were cropped the exact same size, but had been taken with a 6 megapixel camera instead.
Enlargement from a 6 megapixel camera.
Once again, I’m looking at this image at 400% size, so you’re still going to see pixelation in this sample. But notice now that within the confines of my screenshot, the paratrooper is now larger and more pixels are being used. You can make out more details in this version.
The point of showing this is to say that while you’ll probably never see any difference between uncropped images out of a 3 and 6 megapixel camera, you will notice a lot more flexibility if you crop your photos.
It can’t be stated more simply than this: cropping a 6 megapixel photo in half will give you a 3 megapixel photo, and cropping a 3 megapixel photo in half will give you a 1.5 megapixel photo. Get it?
Coming Back to Photoshop
I know I’ve spent a good deal of space talking about digital cameras instead of Photoshop, but hopefully you see the correlation. A key thing you should’ve noticed in the Image Size window is that as long as the Resample option is turned off, it actually makes absolutely no difference what the Resolution setting is. As a desktop publisher, I regularly redefine 72 PPI photos as 300 PPI. I even have a preset action in Photoshop to do it.
What matters to me is the Pixel Dimensions. Anything bigger than 1600×1200 I know is going to work fine for me. Likewise, anything from a 2 or 3 megapixel camera up to 6 or higher is going to be fine for you.
Much smaller, however, and print reproductions begin suffering.
Web Photos
I’ll wrap up by coming full circle on the hypothetical quote at the beginning of this column, “It’s full size on my screen, so it should be large enough.” Much to the annoyance of graphic designers, clients will frequently ask a designer to use this or that photo from a Web site, mistakenly believing it will print just fine. Again, wrong answer.
Take the earlier example of the USSOCOM paratrooper. I had access to the original, full-size digital image for the above examples, but the thumbnail page that I first linked shows the image at only 420×279 pixels. No joke, there are clients who’ll actually send a shot this size for use in print publication.
Do the math. 420×279 at 300 PPI is roughly one and a third inches wide by not even one inch tall!
Further Discussion
I realize this is a very heavy subject and that I may not have done it justice. If you’re still scratching your head over this, I strongly encourage you to ask questions. For me, this is the type of subject that I can do far better at answer questions than at giving a blanket explanation—though I do hope this article has been of some value to you.
Topics For Upcoming Months
- Creating Seamless Tiles
- Mask-erades
- Fun With the Automate Menu
- Photomerge
- Fun With Filters
- File Format Fever
If you have a topic suggestion, please share it. I’m definitely interested in expanding this list with topics that are of interest to you.
![]() Copyright © 2007 Lee Bennett, lbennett@atpm.com.
Copyright © 2007 Lee Bennett, lbennett@atpm.com.
Also in This Series
- File Format Fever · November 2008
- Don’t Reset—Preset! · October 2008
- Don’t Yield—Merge! · September 2008
- What If I Just Left It Alone? · August 2008
- Screen Replacements—When Reality Isn’t Real Enough · July 2008
- No Smoking Gun: Re-tooling Dodge and Burn · May 2008
- Mask-erades · February 2008
- Back in February · November 2007
- I Love Layers · October 2007
- Complete Archive
Reader Comments (15)
2) As Seen on TV: How do you express, to family and friends, the "magic" infinite resolution demonstrated on the crime investigation TV shows when they enlarge a fuzzy image to crystal clarity? Does it make you want to laugh or cry?
1) Most people cannot discern any difference if you upscale a photo perhaps about half again bigger (e.g. from four inches to six), especially if some subtle sharpening is used as well. I'll also admit that I've sometimes intentionally enlarged an image by an insane amount just for the fuzzy effect.
There is a utility called Genuine Fractals which uses a far more complex algorithm for upscaling than Photoshop's. But it's rather expensive. Fortunately, an OEM copy came with my scanner at work, but you're currently looking at $160 to buy it outright.
In my article, I didn't touch on the concept of line screen frequency of halftones, and I don't care to get into too much detail here. However, for those who are familiar with the little halftone dots used to make a single ink appear like it is many tints of that color, the measurement of distance between each dot is the line screen frequency. You'll often find that newspapers are in the 85-100 LPI (lines per inch) range, laser printers often in the 100-150 LPI range, and magazines are around 200 LPI and higher. The greater the LPI, the smoother the halftone appears. This is why you can easily see the halftone dots in a newspaper photo but not so easily in a magazine.
The reason I say this now is because if you know what line screen frequency will be used, you can calculate the minimum resolution that should work with that frequency. I said in the article that I always send my images to press at 300 PPI. That's because most of the items I have printed are at a halftone line screen frequency of 200 LPI. The formula is LPI x 1.5 = minimum PPI. Some people will say LPI x 2, but your mileage may vary. I'm happy with LPI x 1.5.
Therefore, if you have a black and white laser printer that you know only outputs 100 LPI halftones, you only need a 150 PPI image. Any higher of resolution is probably wasted.
I should probably also say that inkjet printers use a different form of screening than traditional halftones. It's called stochastic screening (or FM screening, which stands for Frequency Modulation). Stochastic screening, while it can have drawbacks, usually produces results I like much better. I don't, however, know if there's a specific guideline for the minimum resolution that is ideal for printing on inkjet printers that are using stochastic screening. I've seen acceptable results on photo-quality inkjet printouts with 200 PPI images. However, while my current commercial press cannot do stochastic screens, the previous press I used (I left them for a variety of reasons) did do stochastic screens on request and they advised 300 PPI images just the same as if I were doing traditional halftone screening.
2) I absolutely do want to cry when I see television shows "enhance" an image in the way you describe. But then I just have to remember, it's television and it's fake. I can only pray that most people watching television realize that what they see is probably not possible in real life.
Knowing I wanted 8" x 10" printouts, I scanned at a very high resolution and saved the files as uncompressed .tif files. It turns out I scanned at a higher resolution than I needed. I looked at one of them a minute ago and it was a whopping 300+ MB file. Boy could I have used your help then.
Now on to color calibration.
I am about to publish a book with pictures and the publisher wants me to send my digital pictures 300 dpi. I have no idea what they are talking about. Can you give me some advice? I mean, do they want me to set the Photoshop resolution at 300, save it and then send it to them for each picture? I am totally clueless at this procedures. Thank you very much for your attention, sincerely,
Nestor
I want to believe the first conclusion is true, but if you had read the article, I'm quite sure you would at least have had some idea what your publisher is talking about rather than no idea whatsoever.
May I recommend you read this article (again?). Open Photoshop and actually do the same steps as you're reading. Then, comment here again if you're still missing something, but tell exactly where you got lost.
I want to help you, but just have to determine the best way to do so that the above article doesn't already do.
Thanks.
Annabel
Here's an example workflow that I use which may be of help to you:
First of all, I always keep my original, unedited images. Most of the time, that means it's the 72ppi JPEG file directly from a digital camera. If you keep a separate copy of this original file, then you always have it to fall back on, even if that means you lost any work/editing on a photo.
Then, working on a copy, and with the Resample box turned off, I change the image to 300ppi in preparation for any print work that I'm doing. If I import the same photo into my InDesign project at 72ppi, it would be enormous because InDesign would dutifully represent 72 pixels within one inch of the InDesign page. If you change it to 300ppi, however, InDesign will represent the image smaller, with 300 pixels in a linear inch.
Note that regardless whether it's being shown huge at 72ppi, or smaller size at 300ppi, since the Resample option was off, the image has not changed in quality. It would still be the same number of pixels in height and width. You're only defining how many of those pixels are squeezed into one inch.
After I've done all my editing, I make a another copy of the image so that I still have the full-size version that has been adjusted, and on the copy, I will scale it down in Photoshop so it matches the size I used in InDesign. For this, I turn the Resample option back on. When I do so, I change the height/width values to the amount I need, but the 300ppi stays the same because the Resample box is on. This step will definitely change the resolution and is always my last step, and is always done on a separate copy.
P.S. - The reason I scale my final images to 100% in Photoshop is because page layout programs like InDesign already have enough to worry about in terms of processing at the time a page is sent to an imagesetter to be made into press film. The output is much faster if InDesign isn't having to scale the size of all the photos on the fly at the time you output the job. Sure, I work with the full resolution versions during production so I can change the size back and forth while working. I don't scale them in Photoshop until the final layout is approved.
Hope this helps.
I try setting up the image in photoshop as an 18" x 24" document at 600dpi ( I figured higher dpi is better...?) but the document ends up being like 11,000 x 14,000 or something close to that. My machine really slows down with a document that size. It also makes the files size huge, like 450mb. I know that there's one of these numbers I can change without sacrificing quality (or at least I think I know) but I don't want to learn the hard way by finding out after I've spent all this time painting the work and then having to redo it because the image is too pixelated. Please help me out here if you can. Sorry if I didn't understand your article. I really did read the whole thing. Thanks in advance for any help you can give.
The math isn't really all that hard, and there are two aspects of it to consider.
First: Pixels divided by PPI (that should be Pixels Per Inch, not Dots Per Inch or DPI) equals inches. In other words, whatever number is defined as your PPI (or DPI as people improperly call it) is how many pixels are going to be represented as one inch of the image, either in height or width. Thus: 10,800 (total pixels in width) divided by 600 (pixels per inch) gives you the 18 inches.
Second: more resolution does not automatically mean better. You should make a decision on how much resolution you need for a particular job. In most offset printing scenarios, the amount of resolution you were talking about is completely overkill.
I realize it may get even more confusing when you learn that commercial imagesetters for outputting film and/or plates for commercial printing run in the neighborhood of 2400 PPI and higher. These resolutions are needed for things like simple-color line artwork. Take typefaces, for example. Usually one color and maximum contrast (e.g. black text on a white background). These types of images do need more resolution, but because they're lower number of colors and tend to be smaller in printed size, they don't create a multi-hundred-megabyte file.
You say you are creating a digital painting with what I assume will be a full spectrum of colors. Thus, your image will essentially be like a photograph. The easiest rule of thumb to follow is to use a PPI value that is between 1.5 and 2 times what the halftone line screen frequency will be when the piece is commercially printed.
The halftone frequency refers to the tiny little dots used for printing. Take a magnifying glass and look at the pictures in a newspaper. Start with black and white photos first. Newspapers generally print with a lower screen frequency than magazines. You might even be able to see the dots with your naked eye. The distance of those dots (which are NOT individual pixels, by the way) are measured in terms of the halftone frequency. The measurement is Lines Per Inch, or LPI. Newspapers tend to print anywhere from around 85 to 133 LPI, though some are doing higher. Magazines, however, generally use much better (and more expensive) paper which can handle a finer screen frequency. The higher frequencies on the paper used in newsprint usually make the ink bleed into a solid dark blob. But on the nicer papers used by magazines, you'll generally get 150 to 200 LPI.
Back to the image resolution. I've pretty much always set up my pictures at 300 PPI at the final size they were to be reproduced. Years ago, my less-experienced brain told me I should go with a PPI exactly double the halftone LPI frequency. Back then, we were doing 150 LPI jobs, so I made my photos 300 PPI.
Today, I know that 1.5 times the LPI is sufficient unless the photo has some extremely fine detail in it. However, today, I'm doing all my jobs at 200 LPI. Yet, I still use 300 PPI photos (which is 1.5 times the LPI frequency).
For those photos which have much finer detail, bumping back up to double the LPI is adequate. So, for a 200 LPI frequency, a 400 PPI image will suffice.
Remember those little halftone dots you looked at with the magnifying glass? Those are the reason that any more PPI resolution is wasted—those "larger" halftone dots completely chew up any additional resolution.
Think of it as a container of new tennis balls. They come in a canister of three balls. The balls are pixels and the canister is a halftone dot. Suppose you take out the tennis balls and put golf balls inside. You now have more pixels. But, if you close the canister, you wouldn't really know what was inside just by looking at it because the canister (the halftone dot) is still exactly the same size. So all that extra resolution inside is useless. (Unless, of course, you're a pro golfer!! :-p )
So, lastly, how do you find out what LPI you'll be using? Just ask whoever is doing the press work. In most cases, the press workers will generally reply with another question, "what LPI do you want?" That's because most of them will run the job at whatever frequency you specify—within reason. Talk to them about it, but aim for a 200 line screen.
If they start talking to you about something called a stochastic screen, well, that's an entirely different discussion which doesn't work in terms of halftone LPI. If the press only does stochastic (and more are starting to), then stick with the 300 PPI images or 400 PPI for very fine detail images. You should be pretty safe with those.
In summary, no, you don't need a 600 PPI image. It's fine if you want to paint at 18x24 size just so you have a nice large image for your archive. But setting it up at 300 PPI should be quite adequate. Then, when you're done, make a copy of it (ALWAYS keep original finished images), then scale that copy down to the 9x12 at 300 PPI for your book cover.
Your 7MP camera at 3072 X 2304 at 150ppi is 20.48" X 15.36.
Talk to the photo lab, though. I couldn't say whether they'd tell you 150ppi is too low of resolution, or if they have technology that would make a larger print look nice even though the resolution would technically be less than 150ppi.
There's probably some way to do it. After all, people print enormous banners and billboards that would technically be too big for even 15MP of resolution. The right photo lab could probably get the job done.
But coming full circle, a 1024 X 768 image, I can promise you, is simply light years beyond too small.
Add A Comment