Photoshop for the Curious
Conjuring Speech/Thought Bubbles
I didn’t plan very well. This month’s topic was supposed to have been about digital photo resolution. Somehow, it just happened that it fell on the June issue, which means I was to have worked on it in May. But May is, by leaps and bounds, my busiest and most hectic month of the year, and digital photo resolution is a topic that needs more concentration than I could give this month.
Consequently, for this month’s issue, I’m offering a tutorial that was requested by a reader back when I first began this series—one that is simpler for me to write. That reader wanted to know how to create speech bubbles and thought bubbles. I remember years ago buying those sheets of stickers that looked like speech/thought bubbles—some pre-printed with silly phrases and others left blank to write your own whim.
Well, no need to buy those stickers anymore. Now, you can just make your own in exactly the shape you want them and with exactly the words you desire, and have them already be on the photos if you have digital prints made.
So, let’s start with a silly photo that is just screaming for speech/thought bubbles:

Time to put words into their mouths and heads.
Um, yeah. Just a goofy shot I snapped of some friends. So let’s start with the guy. He’s clearly hollering “OW!!” so let’s make a speech bubble to that effect.
By now, you should already know what step one is. Say it with me: make a copy of the photo and work on it instead of the original.
Now click and hold the Shape tool (right side of the Tool palette, just below the Text tool) and choose the Custom Shape tool. In the Options bar at the top of your screen, click the Shape pop-up menu, then click the small circle with an inner triangle located at the upper right corner of the window. Choose TalkBubbles near the bottom of the menu, then click Append in the resulting dialog box.

A handful of bubbles is already waiting for you in Photoshop.
It’s important for me to say that these bubbles are in Photoshop CS2. I do not know if they exist in prior versions, but it is possible to make your own bubbles, which I’ll cover in a moment.
Once you’ve chosen which bubble you want, click a spot in your image where you want one corner to be and drag to the opposite corner. Your selected bubble shape will stretch to match the area in which you dragged. Don’t worry if you don’t get the size or position quite right. It can easily be moved and stretched.

Dragging the bubble shape to the desired size and position.
After you’ve created the shape, you’ll note that its color will be whatever you have defined as the current foreground color. You’ll also note a new layer in your Layers palette. (Select Layers from the Window menu if your Layers palette isn’t visible.) This new layer is a Shape layer and you’ll see that it has two icons in it. The icon on the left lets you change the shape’s color. Double-click it and you’ll see a Color Picker window in which you can choose white or any color you desire.
If you want to move the bubble, just click the Move tool (top right icon in the Tool palette) then drag it to the desired location. Maybe you want to change its size or to point the directional tail in the opposite direction. No problem. First click the Path Selection tool (the black pointer to the left of the Type tool). If the pointer is the white Direct Selection tool instead of black, click and hold it to select the Path Selection tool instead. Click on the bubble, then press Command-T. You’ll see a transformation box appear around the bubble. In addition to being able to drag the corners to change the size and shape of the bubble, you can either right-click or hold the Control key and click this transformation box, then select Flip Horizontal to point the tail in the other direction.

A speech bubble, ready to hold words.
But suppose you don’t like any of the preset shapes. Hey, this is Photoshop. We can make our own!
Click and hold the Shape tool again and choose either the Rounded Rectangle (my preference for a speech bubble) or Ellipse. If you choose the Rounded Rectangle, you’ll see a Radius selector up in the Options bar at the top of your screen. This value defines how rounded the corners will be.
Just as you did for the preset bubble shape, draw the new shape at whatever location and size you desire. Here’s mine:

Creating the shape for a speech bubble. Remember to double-click the color icon in the Shape layer to set the bubble’s desired color.
Next we’ll add the little pointy tail to show that the speech is coming from the guy. Click and hold the Shape tool again, select the Polygon tool, then set the number of Sides in the Options bar to 3. When you click and drag, a triangle shape will appear, which will get larger the further you drag away from where you clicked. You can also drag around the point where you clicked to change the rotation. It doesn’t need to be perfect yet—just in the ballpark.

Creating a shape that will become the speech bubble’s directional tail.
You’ll see in the Layers palette that shape layers are added for each separate shape. Once the bubble looks the way you want, the pieces need to be combined into a single shape.
Click and hold the black Path Selection tool and instead choose the white Direct Selection tool. Click anywhere on the triangle’s outer edge and you’ll see small squares appear on all three points. Now you can drag each of these three points where you want them. Overlap two of the points just inside the bubble and drag the third to point to the desired location.

Feel free to make the directional tail any size you wish and coming from any point of the speech bubble you wish.
Once you have the shapes the way you want them, they must be combined to behave as a single shape. Go back to the Path Selection (black pointer) tool and click the second icon in one of the shape layers (the one to the right of where you clicked to change the color). This icon is called the Vector Mask Thumbnail, and you’ll see a thin corner outline around it when it’s active.

Combining two shapes into one Shape layer.
Copy this shape by holding the Command key and pressing C, then hide this Shape layer by clicking its little eye icon on the left side of the layer. Next, click the Vector Mask Thumbnail of the other Shape layer and paste the shape you copied—Command key then press V.
With this Shape layer still highlighted and the black pointer Path Selection tool still enabled, click the Combine button in the Options bar at the top of your screen. The bubble is now a single shape, just like the preset bubble we made earlier.
The next two steps are somewhat optional and involve using a function of Photoshop, which I originally planned to cover before this tutorial. So if you have questions about these Layer Styles, you might save them for next month since the July column may provide the answers.
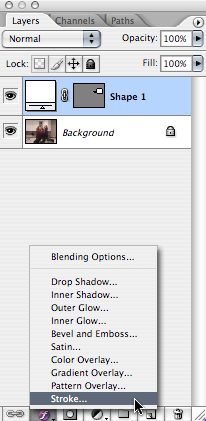
If desired, you can create an outline around the bubble. Make sure the bubble’s Shape layer is highlighted, click the second button at the bottom of the Layers palette that looks like a lower case “f” inside a black circle, then select the Stroke… Layer Style.
The various Layer Styles are applied nondestructively. You can modify them later.
In the resulting dialog window, you can change the stroke outline’s size and change the color. Play with the other options if you like, but for now I’m using a value of 2 pixels for size, and black color.
The second of the two optional steps is adding a shadow behind the bubble. Go back to the Layer Styles button where you found the Stroke… option and choose Drop Shadow… instead. Once again, you can play with the settings to taste, but I set the Angle to 130 degrees, Distance to 10 pixels, and Size to 15 pixels.

The bubble has been outlined and shadowed.
The last thing to do is to add a Text layer with what we want our guy to be saying.

You can just hear his pain!
In addition, if you don’t want to use one of the preset thought bubbles found in the Custom Shapes, you can use the same combining steps to create your own thought bubble. It’ll just require copying and pasting more shapes into one Shape Layer.

Many Ellipses were pasted into a single Shape layer to make this thought bubble.
Of course, if you’re handy with vector drawing tools, you could simply draw the outline without having to overlap a bunch of ovals. We won’t go that far, at least not now.
Once all the shapes are pasted into the same layer, follow the same steps as above—with the black Path Selection tool enabled—to combine them. Also as described above, change the bubble’s color and add a stroke and/or shadow, if desired, and overlay a Text layer.

They say a picture is worth a thousand words. Apparently, this one is only worth nine.
Homework Assignment
The preset Custom Shapes also has a zig-zag shape (or you can make your own). Have more fun creating bursts of words depicting sounds, such as those seen on the campy Batman TV series.

BIFF … THWAAP … KER-CHUNK!!!!
Topics For Upcoming Months
- Effective Layer Effects
- What Does “Dots Per Inch” Really Mean? (A Tutorial on Resolution)
- Creating Seamless Tiles
- Mask-erades
- Fun With the Automate Menu
- Photomerge
- Fun With Filters
- File Format Fever
If you have a topic suggestion, please share it. I’m definitely interested in expanding this list with topics that are of interest to you.
![]() Copyright © 2007 Lee Bennett, lbennett@atpm.com.
Copyright © 2007 Lee Bennett, lbennett@atpm.com.
Also in This Series
- File Format Fever · November 2008
- Don’t Reset—Preset! · October 2008
- Don’t Yield—Merge! · September 2008
- What If I Just Left It Alone? · August 2008
- Screen Replacements—When Reality Isn’t Real Enough · July 2008
- No Smoking Gun: Re-tooling Dodge and Burn · May 2008
- Mask-erades · February 2008
- Back in February · November 2007
- I Love Layers · October 2007
- Complete Archive
Reader Comments (8)
I can't believe I didn't figure out copy and paste works for shape vectors too.
Am I doing something wrong?
Add A Comment