Software Review
Remotix 2.6

Function: VNC remote access to Mac/Windows/Linux computers.
Developer: Nulana LTD.
Price: $20.
Requirements: iOS 4.2; Android version also available.
Trial: Feature-limited (Remotix Lite).
I ordered my first generation iPad as soon as pre-orders were being accepted and had to wait for what seemed like forever for the 3G/Wi-Fi models to appear. Since then, it’s been close at hand, daily tackling a variety of tasks that used to require my trusty MacBook Pro. Even a crack in the screen hasn’t diminished its usefulness.
One of the first things I started experimenting with was using the iPad to control my Mac Pro–based media center. Because that machine was connected directly to our television, I had to either walk into the living room and turn on the TV or activate screen sharing on my MacBook Pro to check progress on even the most basic tasks. Surely there was some program out there that would let me use the iPad to view the Mac Pro’s screen and have at least limited control over the Mac Pro.
By the time the opportunity arose to review Remotix, I had already tried several similar programs with varying degrees of success. I ruled out many of these programs because using even the most basic features required establishing an account somewhere. The extra features were often more than I needed, and, besides, the last thing I wanted was another account. I had been using the free Remotix Lite for a week or two and it was promising, so I thought I would give the full version a try.
Installing Remotix or Remotix Lite
Both Remotix and Remotix Lite install the same way, and for all practical purposes run the same way. The only difference you will notice is that the full version has a few features not included in the Lite version. In both cases, installation on your iOS device is as simple as it gets: download the program from the iTunes App Store as you would any other app. The next time you sync your device with iTunes, Remotix will be there ready for you to configure and use.
Configuring the Computers You Want to Control
Before you start configuring Remotix, there may be some changes that you need to make on the Macs and PCs you want to control. On the Mac side, there’s no need to install additional software. You do need to open the Sharing preference pane and enable either Screen Sharing or Remote Administration.
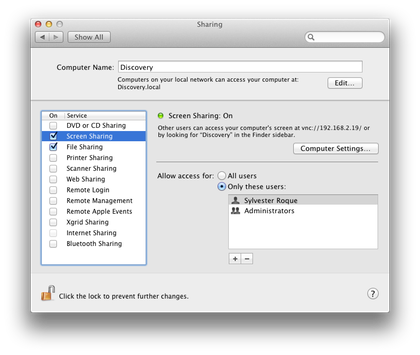
Screen Sharing Enabled
In either case, click the Computer Settings button to access additional settings that control the degree of access each user is allowed.

Remote Management Options
Near the top of the Sharing pane is a phrase that says “Computers on your local network can access your computer at: computer name.local.” Make a note of the “computer name.local” part; you’ll need it later. Since I’m logging into administrator accounts on my own machines, I only needed to enable screen sharing to perform the tasks I need. I log into the Mac using the same user name and password I would normally use to log into those systems.
For Mac users who choose to use it, Remotix also supports logging in using authentication keys rather than passwords. Using this method, you don’t need to remember different passwords for each of your defined servers. A public key is installed on all servers, and a private key is stored on your iOS device. Directions for creating both the public and private keys are covered nicely in the Remotix help files.
If you will be using either Remotix product to control a Windows PC, the Remotix help files recommend using either UltraVNC or TightVNC. Several other variations of the VNC protocol are also supported. With UltraVNC, your Windows user name and password can be used for authentication.
Remotix currently supports a variety of authentication protocols, so it should be useful in a variety of settings. When connecting to a computer running OS X, Remotix supports Screen Sharing in both “Ask for control” and “Ask to observe” modes. Authentication using your OS X user name and password is also supported.
Configuring Remotix
Now that the computers you want to control are configured, let’s configure Remotix so that it’s able to talk to them. Launch Remotix on your iOS device. After a brief splash screen, the main screen appears. Once setup is complete, this screen becomes a command center of sorts where you can choose the computer that you wish to control. Clicking the “Settings” button in the upper left corner of the screen brings up a few basic settings for the Remotix program itself. The help file is accessed here, as well as a setting to choose a different background image.
Don’t be fooled into thinking these options are purely cosmetic. The “Add new scanner” button is a recently added feature. It can be used to scan your network in search of servers (devices) to control.
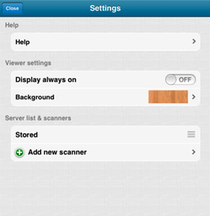
Basic Remotix Settings
Tap the “Add new scanner” button, and you can choose to scan Wi-Fi, 3G, and a few other network interfaces for potential servers. Scanning most of the interface types identifies devices based upon their network address. The nice thing is that if you scan for devices such as Macs that are Bonjour-aware they are identified based upon their device name, not some cryptic numeric ID.
This scanner feature can be a quick way to identify potential servers, although it will identify anything in range that is using the interface you chose, including some servers (devices) that you are unable to connect to due to configuration/credentials issues. Remotix found, but was unable to connect to and control, my wireless printer, for example. If scanning a particular network interface yields too many useless connections, you can delete that scanner and configure servers manually. If you find yourself configuring new servers regularly, consider purchasing the full version of Remotix. The very useful scanner feature is not in the Lite version.
Manually Configuring Servers
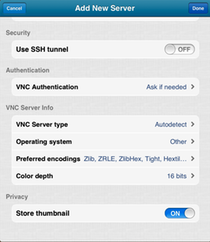
Clicking the + symbol in the upper right corner of the Remotix screen brings up the “Add New Server” screen. This allows you to manually enter connection information for servers that could not be found automatically.
Manually Adding a New Server
Most of the settings are either self-explanatory or explained well in the help file. The settings for port number, VNC Authentication, and VNC Server Type can often be left as they are. I set VNC Authentication for Mac OS X, but you have other options.

VNC Authentication Options
In the Name field, choose one that will be easy to remember. On a Mac, I usually use the name I gave the computer I am going to control.
In the Host/IP field of the Add New Server screen you could use an IP address. In my setup, I’ve chosen to use the computer name instead for convenience. Use the name that appears in the Sharing preference pane. Remember the name I told you to make note of earlier? That’s the name that gets entered in the Host/IP field.
We’re almost finished with the configuration. Tap the Operating System field and check the OS for the type of computer you want to control. In the full version of Remotix, you can also control the quality of the image that you see on the iPad. If you are connecting to a Mac, Remotix can present your Mac’s screen in in one of five different quality levels to accommodate your needs and the speed of your Internet/network connection. The picture quality choices are “Black & White,” “Grayscale,” “Medium,” “Highest,” and “Adaptive.” Each increase in this setting improves the image your iOS device presents of your Mac’s screen. Of course, there is a corresponding increase in the amount of bandwidth needed. The developers suggest that those with slower networks try the “Adaptive” setting as a good balance between picture quality and performance.
Remotix Lite is limited to Black and White or Grayscale images only. That’s pretty much all there is to configuration for most users. If you need it, SSH authentication is also an option. There is also an option to save a thumbnail of the desktop when you disconnect from a server. It’s an easy way to identify various machines quickly.
Using Remotix
Until now, I’ve spent most of my time discussing the initial setup of Remotix. I hope you haven’t gotten the impression that it is a difficult process, because it really isn’t. The nice thing it that using Remotix is just as easy and perhaps easier. Once you’ve configured a server, initiating a connection is as easy as tapping the thumbnail for the server that you want to use. Depending upon which form of authentication you’ve chosen, you may be asked for a user name and password. If you like, Remotix can remember these details for you.
Once you have connected to a server, gestures behave the way you expect them to on iOS devices. The two-finger pinch gesture that shrinks pictures shrinks the screen image of your server. Expanding your fingers expands the area of the screen you’re working in. Nice if your fingers are a bit clumsy like mine. In fact there is full gesture support in the current version of Remotix.
If you’re used to using extended keyboards with your Mac and find that trying to emulate those keys on on iOS device is cumbersome, you should really take a look at the full version of Remotix, which has extended keyboard support.

Extended Keyboard Support
I have to say that as intuitive as the iPad is, I find navigating through an iTunes playlist a bit cumbersome unless I really enlarge the screen. The area you need to press to trigger a specific song is just too small for my fingers. Since Remotix easily supports the arrow keys, this process is much easier for me. That and the ability to have adaptive image quality are worth the price of admission for me.
Final Thoughts
It took me longer to write this review than I anticipated, and that might be a good thing. I found out that the developers are apparently serious about improving the product. The first few days I used Remotix Lite, it would occasionally appear to quit. The app was still running in my iPad’s multitasking bar, but it wasn’t on screen. Tapping the program would bring it right back up, fully functional. Sometimes it worked for days without a problem, then the behavior repeated. Shortly after I agreed to write the review of the full version, an update came out that stabilized the program for me. Additional updates have been released, bringing improved performance and some interesting new features such as network scanning.
Remotix Lite will be sufficient for many users. I like it and still use it from time to time. Even though I had a license for a review copy, I paid for the full version. The adaptive picture quality, extended keyboard support, and network scanning are well worth the $20 price to me. It’s much easier to control my media machine now.
![]() Copyright © 2012 Sylvester Roque. Reviewing in ATPM is open to anyone.
If you’re interested, write to us at reviews@atpm.com.
Copyright © 2012 Sylvester Roque. Reviewing in ATPM is open to anyone.
If you’re interested, write to us at reviews@atpm.com.
Reader Comments (0)
Add A Comment