Software Review
Posterino 2.0.4

Function: Makes collages from your photo collection.
Developer: Zykloid Software
Price: $25; $15 (upgrade)
Requirements: Mac OS 10.6.
Trial: Feature-limited (watermark when exporting)
Posterino lets you turn your photo collection into posters and collages. I reviewed version 1.5.1 of Posterino in the June 2009 issue of ATPM. It was recently upgraded to version 2. What are the new features in Posterino 2? Is it worth the upgrade?
Installation
Posterino installation is the typical download-mount-drag-and-drop no-brainer process. However, if you have an older version, I suggest renaming it to avoid overwriting it with the new version. Unregistered, Posterino watermarks the two words “Posterino Demo” on your creations when you export them.
Usage
Posterino lets you create a variety of posters, from simple ones the size of a school notebook showing a photo of each season, to wall-sized ones featuring every piece of outdated hardware you ever owned. You are presented a few templates to choose from, then Posterino loads photos from iPhoto, the Finder’s Pictures folder, etc. for you to fill the template. You can add text and rotate/position/resize the photos. You can export the result to disk or iPhoto, or share with the Internet via Flickr or e-mail. For me, the ability to make themed “posters” showing a large quantity of photos is Posterino’s strong point. Imagine showing your collection of Apple hardware, all the faces of people who attended your high school’s Silver Reunion, or places you visited in the past decade, all on a big poster. Quantity can produce quality.
Upgrade
Posterino 2 brings along a few new templates, too few for my expectation of a version jump. The Life Poster template is renamed to simply Posterinos and the Postcards are now called E-Cards. Some of the new templates make use of angling the photos, and that fooled me into thinking angle adjustment was a new feature in Posterino 2. What is indeed new is the ability to apply filters and frames to the photos. Filters and frames are usually referred to as layers.
As the Pop and Western templates show, you can change the color values of all the photos to make them look overexposed or time-worn. With other layers, you can change the contrast or sharpness of the photos, or turn them black and white. The collection of layers known as frames embellishes the borders or frames the photos in use. You have photo corners, passe-partout (sort of 3D-ish), shadow (with the shadow barely noticeable if left with default settings), and thin. My favorite layer is the Metadata, in which you can overlay date, time, name, or comment (from iPhoto), with choices of location and text color. I love to keep my photos descriptive, and the Metadata layer provides a quick way to include my descriptive words in the poster. With photos imported from the Finder, I couldn’t get Spotlight comments to show, but the other metadata displayed properly.
There are three different ways to add layers, and each way gives you a different level of control, and, I must add, a different level of usefulness. The simplest way is via the drop-down menu from the top, Images ‣ Add Layers. Layers like Photo Corners and Postage Stamp work fine when added this way, but for others you don’t see any effects at all.
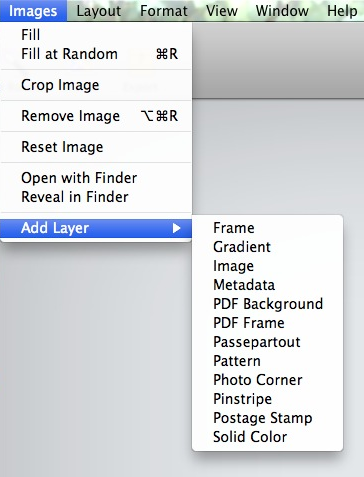
Add layers to your images quickly, but you don’t always see what the change is.
The next way to use layers is by going into Layout mode, via View ‣ Show Layout. Here, layers are broken down into two categories, Filter and Frames, as shown in the upper right of the screen. Again, not all layers’ effect can be seen as they are applied, but at least you now have an idea of what they do, like the Date layer or the Vintage layer. Strangely, in Layout mode you can apply one frame and one filter at a time. What’s more, you can only apply the layers to all the photos, i.e., you cannot apply one layer to only one individual photo.

In Layout mode, the layers are a bit clearer, but now only one layer can be used at a time.
Last, we have the Inspector, a floating window from which you have 100% control of the many settings the layers have. I found the simple Shadow Frame in the layout to be inadequate, too light, and too close to the photo so the shadow is barely noticeable. With the Inspector, not only I can adjust the shadow’s offset, but I can also adjust its angle and color. Likewise, with the Metadata layer, I no longer have to be limited to the date metadata, as in Layout mode, but I can make use of comment, name, and time as well. You also finally have all the layers made available to you, even though they are not stored where you may expect it. For example, the Vintage layer is really a setting of the Image layer.

The floating Inspector window is where you can fine-tune your layers. Here I went overboard and added three Metadata layers.
Other new features found in Posterino 2 include working in full-screen so you can avoid being distracted; sorting of images by date, name, or rating; and, in the Layout mode, changing the grid of images on the fly. Export options now include making the current poster a Desktop image.
Sometimes upgrades make the product less useful. Gone from Posterino is the ability to generate your own grid. In 1.x, selecting Poster ‣ Layout Generator presents a window where you can type in exactly what you want. With Posterino 2, the only way to specify the grid is to go into Layout mode and slowly walk through the prefabricated ones. I recently made a poster showing about 150 faces and quickly did so by specifying a 10 by 15 grid with the older Posterino. It is nice that the upgrade provides the ready-made grids, but it should leave alone the ability to generate grids. Similarly, Show Grid and Snap To Grid are no longer available.
You can no longer specify your own grid.
Still found in Posterino 2 is the detailed Apple Help from version 1.x. Try to find more info on what the layers do, and all you get is where to find them on the menu. A screencast on Zykloid’s Web site covers some basic stuff, but the layers deserve a whole new chapter in the documentation. It would be nice if Zykloid set up a forum for Posterino users to exchange ideas and help each other.
Some Bugs
While checking out the various features of Posterino 2, I came across a few bugs. Nothing serious, at most mildly annoying. The first one to come to mind is that the Revert function does not work. Say you start working on an existing poster and get too gung-ho with tweaking the layers through the Inspector. Instead of clicking Undo several times, or quitting without saving, you figure it would be more gracious to select File ‣ Revert. Don’t do it, because it does not work. You will end up with something like the next screenshot. You are at maximum zoom but yet the poster appears to be zoomed in. All your photos are gone, but worry not; just quit Posterino 2 and re-launch it. Note that simply closing the document and re-opening will not do. You have to re-launch Posterino.

Relax, your handiwork was not destroyed. Just re-start Posterino, and the poster will come back intact.
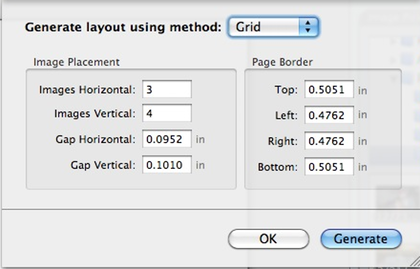
Another bug, perhaps more of a design error, is that the Background and Layout gadgets in Layout mode do not play well with zooming. When clicked on, those gadgets show their offering in a window that opens to the right of the images. Viewed normally, the Layout screen has plenty of room around it for the gadgets to spread their windows. Zoomed in a few levels, though, and the gadgets’ windows would be cut off.

In Layout mode, the gadgets show their options in pop-up windows, such as the Layout gadget’s Grid shown here.

While the poster is zoomed in, the gadgets would still open their windows the same way and get obstructed.
Upgrade?
Originally, I was not impressed with the number of layers available. For a version jump from 1.x to 2, I expected to be awed with a long list of effects. Discovering the Inspector window satisfied me somewhat, but then it raised the question of why not make the Inspector the only way to use layers. It is confusing not to see any changes once you applied a layer. Then there is the issue with the pop-up gadgets not showing their windows properly when zoomed in. Personally, I will avoid the Layout mode altogether.
With Facebook being so popular, I am surprised that Posterino 2 does not have an export option for that social network. I suppose you could upload to Flickr and make use of some Flickr application within Facebook to pull the poster in. Still, I prefer to post directly to Facebook. It would be wonderful if there were an option to export a poster as a movie with Ken Burns effect, i.e. with the camera zoomed in on the individual photos then panned around slowly.
Despite my complaints, I still think Posterino 2 is a worthwhile upgrade. The layers, few as they are, will come in handy, especially if you stick with the Inspector view. I will definitely make much use of the Metadata layer to better add captions to my photos. Randomly filling the big posters is nice, but being able to sort the photos by name or date is a big plus.
Conclusion
I liked Posterino 1.x very much and looked forward to also giving 2.x a Very Nice rating. Unfortunately, the way to get to the new layer feature is bumpy, and the lack of documentation does not help. Other new features make the upgrade worthwhile, but for the overall product I can only put it at Good.
![]() Copyright © 2011 Linus Ly. Reviewing in ATPM is open to anyone. If you’re
interested, write to us at reviews@atpm.com.
Copyright © 2011 Linus Ly. Reviewing in ATPM is open to anyone. If you’re
interested, write to us at reviews@atpm.com.
Reader Comments (0)
Add A Comment