How To
Building Your Own Additions to the Services Menu
One of the things that I have enjoyed about writing this column is that it provides opportunities to learn new things about the Mac. After a few years of trying to think of new How To projects every month, I’m still finding aspects of Mac OS X that I was either unaware of or had largely ignored. This was the case with the Services menu. Until I heard my friend Rick Prather talking about the usefulness of the Services menu on Mac OSG podcast episode 107, I had pretty much ignored its existence. Shame on me. The Services menu can indeed be a handy thing to have around. If you have already upgraded to Snow Leopard, you can easily increase its utility even further. Let’s take a look at what the Services menu does and how to make it more useful.
When Did We Get a Services Menu?
I’ve been using OS X since version 10.0 and had never paid much attention to the Services menu. Rick’s comments about its usefulness started me wondering when it had been introduced. Surely this was something new that I had just missed?
Well, I hate to admit it, but services aren’t new. Clint Bagwell of MacTech magazine reminds us that this feature has been around since the beginning of OS X. It’s one of many innovations that had its genesis in NeXT. and made the transition to the first versions of OS X.
What Are Services?
Once I learned what services were, I remembered reading about them shortly before OS X was introduced. The whole purpose of services is to allow programs to share among themselves. That doesn’t sound newsworthy. That ability has been around since the inception of the Mac in the form of the Cut, Copy, and Paste commands. However, services take that level of sharing one step further. As Mr. Bagwell notes, “The Services menu extends an application’s functionality by providing some of its own capabilities to other programs. When an application signs up for services, it takes advantage of another application’s abilities as well.” That’s the critical difference between sharing through services and the normal data sharing that exists through the clipboard. Services provide a means for programs to share capabilities in addition to data.
Perhaps an example will illustrate the capabilities of items in the Services menu. Select several paragraphs from this article then go to the Services menu and select Summarize. A small box appears with the text that you have selected inside the box. Move the “Summary Size” slider between 1 and 100 percent. Notice that at 100 percent the text is left unaltered—just as it is in this article. As the slider moves left toward 1 percent, some of the information is removed in an effort to summarize the text. The closer you come to 1 percent the more text is removed to shrink the summary. Don’t be alarmed. The original text of the article is unharmed. Only the text in the Summary window is being changed.
This demonstrates quite well how the Summary service differs from using the clipboard. In a traditional copy and paste operation, the selected text would be pasted from one application to another with no alteration in length or content—other than the occasional loss of formatting. Copy the text from the Summary window to another application and it is this summary that gets pasted to the new location—not a copy of the original text.
Putting Services in Context
One of the most important things to remember about services is that they are contextual. Context dictates which options are available, and to some extent, where the services appear. Let’s begin with what options appear, then we’ll briefly examine where the items appear.
Since you probably have no text selected, go to the Services menu and try to choose Summarize. Right away you’ll notice that with no text selected, Summarize is no longer available. Without text to act upon that service is useless, so OS X excludes it from the list of choices. This is one area where Snow Leopard deviates from previous versions of OS X. In the past, services that didn’t apply to the type of information selected merely appeared grayed-out in the menu. Under Snow Leopard, services that don’t apply to the selected information simply don’t appear in the list. Compare the mess from my 10.5.8 Services menu to its current Snow Leopard counterpart:

The Leopard Services Menu

The Snow Leopard Services Menu
Services can also appear as contextual menu items in the Finder as well as in other applications.
Customizable Services?
The Snow Leopard upgrade tweaked several aspects of OS X. One of these changes has come to services. Under Leopard, all services installed by any programs appear in the Services menu. If they are not applicable to the task at hand they appear grayed-out. Cleaning up the menu generally required third-party software.
Under Snow Leopard, users have a means of controlling the Services menu. A quick trip to the Keyboard Shortcuts section of the Keyboard preferences pane yields a gem. Clicking the Services option in the left pane brings up a list of available services in the right pane. For convenience, the services are grouped according to the type of data they act upon. If you want access to a particular service, make sure its box is checked; otherwise the service doesn’t appear in any context. Stopping those services that convert Chinese, for example, is as simple as clearing the checkboxes from those services.
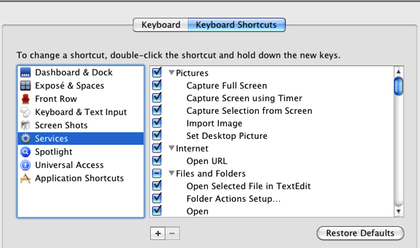
Managing Services from the Keyboard Preferences Pane
This is also the first place to go if you have a problem with services. Want to assign a keyboard shortcut to a service? Follow the same procedure that you would in assigning any other keyboard shortcut. Select the name of the service and double-click in the column of shortcuts at the right. If you have recently updated your system software and lost a service or two, this is also the place to check. Make sure that the boxes for your missing services are checked.
If you read this far, you’ve probably investigated the services on your system by now. Each user’s list will be a little different depending on the applications installed on that specific system. That’s wonderful, but what if you don’t have a service that would be really useful? You should know by now that if I didn’t have an answer I wouldn’t be wasting your time.
Adding New Services
Under Snow Leopard, users can modify the Services menu, or even create their own services without the use of third-party software. Leopard users will need some assistance from additional software. Not being a programmer I’ll leave that to others. Philippe Mougin’s thoughts on becoming an OS X Services Ninja should be a good starting point.
Snow Leopard users have other options available to them. It’s possible to download free OS X services that can be easily installed. Most installations are as simple as downloading the desired collection of services, unzipping the file, and double-clicking the installer. Installation requires entering an administrator password to complete. Still can’t find what you need? Snow Leopard users can create their own services without resorting to third-party software.
Creating Your Own Services
Along with all the other changes that came with a Snow Leopard upgrade came the ability to create your own services using Automator. Building your own service isn’t as difficult as you might think, and Automator tries to help as much as possible. If we put together all that’s been learned thus far, building our first useful service probably won’t require any help at all—if we put in a little thought first.
Because services are so context-driven, it’s important to think carefully about what exactly you want the service to do and under what circumstances you want the service to be available. Is this something you need to operate on text files, PDF files, or images? Should it work in the Finder, in specific applications, or globally in all applications? Even if the service involves several steps, these questions have to be answered.
For my new service, I would like to build upon a function in the Finder that pre-dates OS X. Select a file in the Finder and choose Print. Your Mac will dutifully print one copy of the selected file immediately without even opening the Print dialog or the host application. This is a great idea that I often neglect to use. The problem is, if you have access to multiple printers, the Finder does not allow a choice of which printer will be used. In my case, I decided to create a service that duplicates the Finder’s print functionality but allows me to choose the target printer. It’s pretty easy, so let’s get started.
Before launching Automator, a bit of preparation is needed to make this service function properly. The Automator action which provides you with the list of printer choices gets its information from the list of printers installed on your system. Make sure that you have gone to the Printer and Fax preference pane and installed the printers you want to use. If you already have these printers installed you don’t need to repeat this process. While we are here, though, write down the full names of the printers you want to use. We may need that information later. For now, it’s time to launch Automator and get to work.
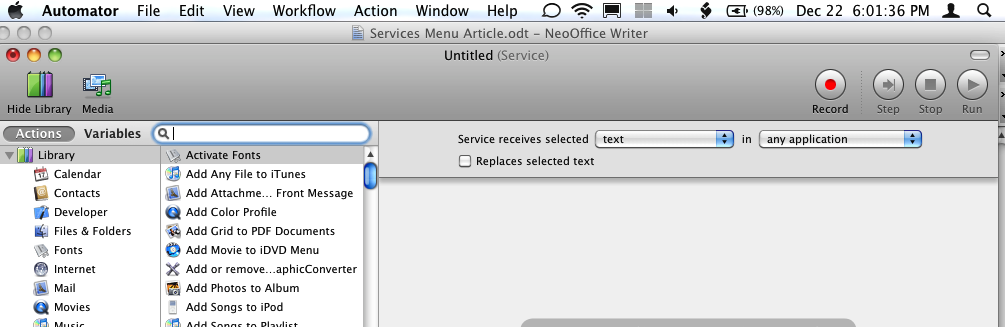
With the advent of Snow Leopard, Automator’s main screen has changed. When the first screen appears asking you to choose a template for your workflow, choose Service and click Choose.

Choosing an Automator Template
The screen will shift to the Services template. The pop-up menus at the very top will be used to set the contexts in which we want this service to function. Take a moment to look at the various options.
Automator’s Services Template
Set the first menu to Documents and the second to Finder. This option tells our service to work on documents in the Finder. It won’t be available anywhere else.
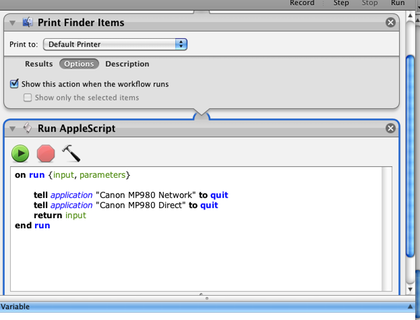
Now we need to finish the building process. In Automator’s search window, start typing “Print Finder Items” without the quotation marks. When that object appears in the list, drag it to the right side of the window as the first step in our service. If you click the “Print To” portion of this step, you should see a list of the printers installed on your computer even if they are not all currently available.
Before we leave this step, click on the word “Options.” The Automator action step will expand and reveal a checkbox. Click the box that says “Show this action when the workflow runs.” Selecting this option is the heart of this service: without this box checked, the Finder will not show us the list of available printers.
We could stop at this point, and the service would work fine. The problem is that once run it would leave the print queue for the selected printer open in the Dock until you manually close it. That’s not too bad, but let’s fix things so the print queue closes itself. Remember earlier when we saved the names of your printers? We need those names now. Go to Automator’s search window and type “Run AppleScript” without the quotes. Drop the Run Applescript command into the window on the right. You will need to insert the following code into the Run AppleScript window:
on run {input, parameters}
    tell application "Canon MP980 Network" to quit
    tell application "Canon MP980 Direct" to quit
    return input
end run
Before we leave the AppleScript window and save our work we need to make one change. Where my code has the words “Canon MP980 Network” and “Canon MP980 Direct” insert the names of your printers. You need a line like that for each of your printers, and the name must be in quotes. Now you know why we need the names. It should be possible to close the print queue for the specific printer that was chosen rather than each printer sequentially, but I haven’t figured that out yet. Click the hammer in the AppleScript pane, and it will check your work for obvious errors.
The Completed Service
If you try to test the service by running it within Automator you will be warned about the workflow needing an extra step to run within Automator during testing. If you want to test things, find that action and insert it as the first action the Automator window. You’ll need to click add to specify a test file. This action can be removed once you are sure everything is working properly.
Once any testing is completed and mistakes corrected, choose Save As from Automator’s File Menu. Since we chose to use the Service template, Automator knows that it is saving a service and puts the file in ~/Library/Services. Congratulations! You’ve just created your fist service! What will you think of next?
Final Thoughts
The impetus for this service came from this thread at Mac OS X Hints. There are a few changes I would like to make when I have more time to experiment. As it is currently, this service doesn’t open an application to print. That’s a good thing, but I would like to be able to bring up the Print dialog to make adjustments without opening an application. It would also be nice to be able to read which printer the user has chosen and have the service only close that printer without the user having to list each printer in the closing AppleScript.
Over the next few months, I hope to have a few more ideas about some of the underused features of Mac OS X. If you have any suggestions feel free to pass them on.
![]() Copyright © 2010 Sylvester Roque, sroque@atpm.com.
Copyright © 2010 Sylvester Roque, sroque@atpm.com.
Also in This Series
- Give Alert Sounds a Little Personality · March 2012
- Create Your Own iPhone Ringtones · February 2012
- Create Your Own Homemade Audio Book · December 2011
- Upgrade to Lion Painlessly · August 2011
- Make the Most of TextEdit · July 2011
- Using the Free Disk Utility on Your Mac · May 2011
- Making Use of QuickTime X · March 2011
- Making the Most of What’s Already on Your Mac · February 2011
- Making the Most of What’s Already on Your Mac · January 2011
- Complete Archive
Reader Comments (1)
Add A Comment